With Delivery Hub's Delivery Notifications feature, you can configure automatic SMS and Email notifications to your customers to update them in real-time as their orders are fulfilled.
By keeping your customers informed and giving them the power to actively track their orders using the tracking link, you can reduce WISMO (Where is My Order?) calls, boost customer confidence, and proactively alert customers to cancelations and delays. This also enables you to maintain your branding and establish a continuous line of communication to continue building a relationship with your customer.
If you don't have access to this feature, you can still set up that include a tracking number for each shipment, then send notifications through a third party. Learn more.
To access the Delivery Notifications feature, contact your Bringg customer service representative.
Note
Delivery Hub sends Delivery Notifications to the email or phone number included in the Billing Address for each shipment.
Before You Begin
Determine the look, timing, and content of your notifications.
Discuss with your marketing team to ensure your messages align with your company's branding and communication strategies. For example, do you want to include Customer Support contact information when shipments are delayed, or share that information only when shipments are canceled?
Strategically choose notifications at specific milestones in the delivery process to limit notification overload and reduce SMS fees while keeping your customers informed and attentive to critical messages. For example, you might send notifications when an order is created, skip notifications when shipments are created, and contact customers again once the carrier has picked up their shipment.
Determine the HTML layout and content of email messages, including the subject line. Delivery Hub provides a default template if you don't add your own.
Determine an alternate way to contact customers who opt out of receiving notifications.
Configure Notifications
View and Enable Notifications
Step 1 Go to Settings > Delivery Notifications.
Step 2 Select the SMS or Email tab.
You can use only one method or send email for some events (such as Order Created) and SMS for others (such as Out for Delivery).
Note
Sending notifications via SMS incurs additional charges, which are added to your invoice.
Step 3 Select a notification to view more details and options. You can then select Hide Details to collapse the notification and Show Details to expand it.
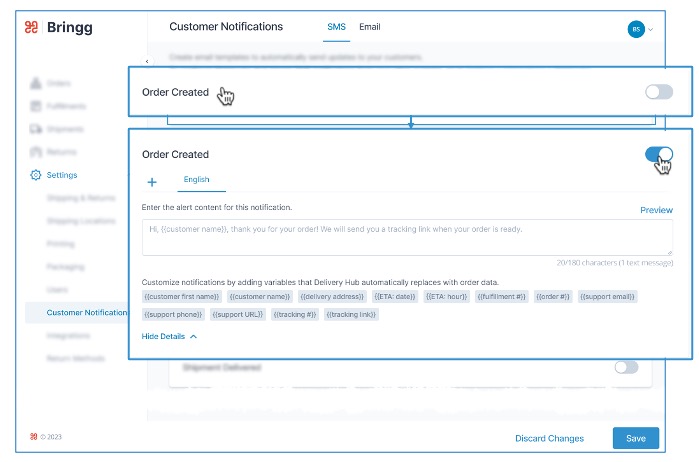
Step 4 Enable the notifications you wish to send to your customers by selecting the toggle ![]() .
.
Notification | Sent when... |
|---|---|
Order Created | ... a new order is created in Delivery Hub. |
Shipment Created | ... a new shipment is created. |
Shipment Ready to Be Picked Up | ... a shipment has been booked and is ready for the carrier to pick up. |
Shipment in Transit | ... the carrier has picked up the shipment and it is on the way to its destination. |
Shipment Out for Delivery | ... the shipment is with a driver and is scheduled to be delivered to the delivery address the same day. |
Shipment Delivered | ... a shipment has been delivered to the customer's address. |
Order Delivered | ... the entirety of an order has been delivered to the customer's address. |
Shipment Canceled | ... a retailer cancels one shipment of an order. For example, a customer might cancel one item from their order because it is expected to arrive too late. When only one shipment exists for an order, and that shipment is canceled, customers might receive this notification in addition to the Order Canceled notification. |
Order Canceled | ... a retailer cancels an order. This usually occurs at the customer's request or when the order cannot be fulfilled. |
Shipment Canceled by Carrier | ... the carrier cancels before pickup. If you use Shipping Rules, Delivery Hub automatically assigns this shipment to the next available preferred carrier. Otherwise, a new carrier must be manually assigned. |
Shipment Exception | ... there is an unexpected problem or delay with a shipment. When carriers send more information, customers can find an explanation for the delay on the tracking page. |
Package Exception | … there is an unexpected problem or delay with a package. When carriers send more information, customers can find an explanation for the delay on the tracking page. |
Create an HTML Email Template
(Optional) To create an email notification using custom HTML, select Create HTML Template, then paste your HTML and select Save on the HTML window and again on the main notifications page.
If you need to change the HTML, you can always return and select Edit HTML Template to update it.
Edit Templates and Add Variables
For SMS and email notifications, you can use or update the default content provided for each notification.
To customize messages for each customer and order, add variables that Delivery Hub automatically replaces with order details for each message. To add a variable, make sure your cursor is at the correct location in the text box, then select the variable or type the phrase surrounded by two curly brackets.
.jpg)
Tip
As you draft your notifications, Delivery Hub displays the number of characters and the resulting number of SMS to be sent per message. The character limit per message may vary per carrier. Each SMS is added to your invoice, so to save on costs, it is best to avoid sending multiple messages for each notification.
Variable | Description |
|---|---|
@carrier | The carrier booked to deliver this shipment. |
@customer_name | The receiving customer's full name. |
@delivery_address | The delivery address for this order. |
@eta_date | The date when the delivery is expected to arrive. Note While ETAs are often provided to let you know by when a shipment is expected to arrive, the date and time are not always known, especially at early points in the delivery journey. It is best to add this variable only when you are sure the information will be provided. |
@fulfillment_id | The shipment's fulfillment ID. |
@fulfillment_source_id, @order_source_id, @shipment_source_id | The ID for this shipment, fulfillment, or order in an external system, such as your OMS. |
@order_id | The overall order ID. This number is most useful for notifications that refer to an entire order, such as the Order Created or Order Canceled notifications. |
@products_table | (Email only) Includes a list of products included in the shipment, including item quantities and SKUs. |
@service | (Email only) The service level for the booking, such as Standard or Express. |
@shipment_id | The shipment ID number. |
@support_url}}, | The link, email, or phone number that customers can use to get in touch with you. Add this information in Settings > Account > Branding. |
@tracking_number | The number your customer can use to track this order. This is particularly important if you don't include the tracking link. |
@tracking_url | A link to Delivery Hub's customer-facing Delivery Tracking UI, which customers can check at any point to view an overview of their order. Once a shipment is created, they can also view the current delivery status and shipping history. Learn more. |
Add Languages
Add more languages to reach more customers.
.jpg)
Step 1 Select the ![]() icon and choose languages from the dropdown list.
icon and choose languages from the dropdown list.
Step 2 Select a language tab to add alert content (including subject lines for email templates).
Please note that there are currently no default messages for languages other than English.
Step 3 If you are sending order information to Delivery Hub via API, make sure that the locale parameter in the customer object is populating with the customer’s language.
Preview and Save Notifications
To see how your messages appear to customers, select Preview.
Step 1 Select Save to finalize your changes.
Tip
Selecting Discard Changes deletes all of the text you added. If you want to save your changes but you are not ready to enable messages, you can disable specific notifications by turning off the toggle. Then, select Save to preserve your drafts to edit and enable at a later date.
Step 2 If you are using a staging account, you can test delivery notifications by simulating the progression of shipping statuses. Learn more.
Step 3 To view a list of messages that could not be sent or received, go to Settings > Integrations > Logs.
Customize “From” and BCC Emails
You can configure the sender email address that appears in the “from” field when your customers receive emails from Delivery Hub. This email should end in @bringg.com.
You can also add a “BCC” address to automatically forward emails to a specified address.
To add email addresses, go to Settings > Account > Branding.
