Delivery Hub streamlines the packing and shipping process by providing you with all the information you need to select the most efficient packaging and carrier for each shipment.
Prepare Shipments Using Smart Pack
Delivery Hub can suggest the most efficient packaging for each shipment using the dimensions you provide in Settings > Packages and our boxing algorithm. When you enable Smart Pack, Delivery Hub automatically adds the inventory in a shipment to packages, so all packers need to do is print the packing slip and pack.
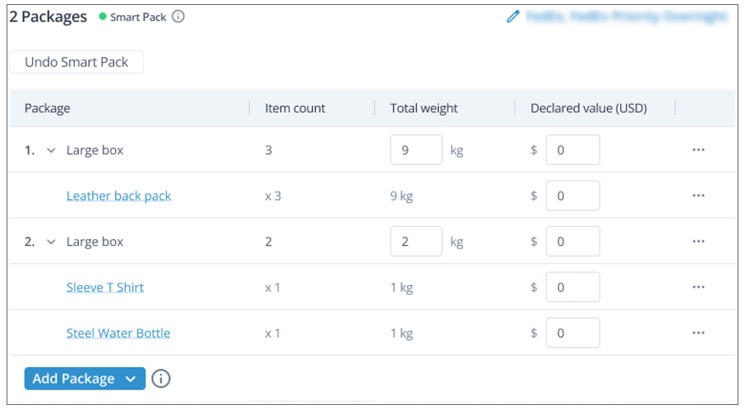
Confirm packaging selection
If the suggested packages are suitable, move to the next step by selecting a carrier and service level. If that has already been assigned, select Book & Print to confirm the packaging and carrier assignments and send the fulfillment's documentation to the printer.
Undo Smart Pack
Sometimes you may need to reassign packaging to inventory, for example, if you have run out of a specific type of packaging.
To redo packaging assignments, select Undo Smart Pack unpack one item by selecting the action menu > Return to Items to pack. This moves items back to the inventory list. Then assign items to new packaging based on the instructions below.
Manually Select and Assign Packaging
Step 1 Go to Fulfillments and select the ID of a fulfillment to pack.
Step 2 Check the Dimensions and Quantity of the items to be packed.
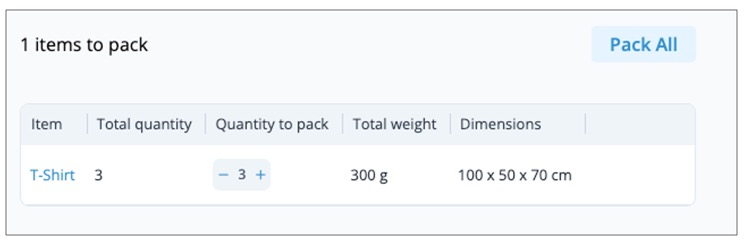 Select the number of items to pack using the + and - buttons
 Step 3 Select Add Package then choose the packaging that best fits the dimensions of the items to be packed.
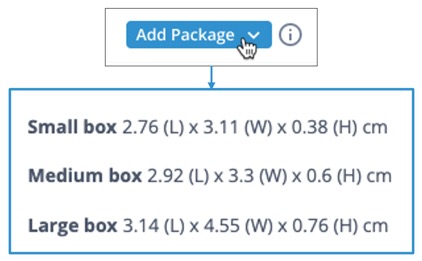 Add packages to a fulfillment
Step 4 Select the amount of each item to pack. For example, the order might include three t-shirts, but you may only have room for two of them in a package.
Step 5 Hover over the first item to pack, then select Pack.
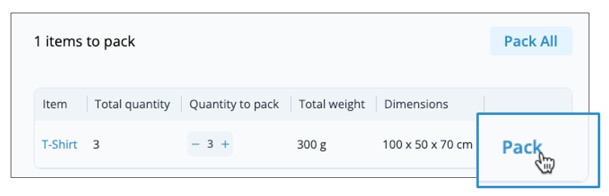 Select Pack to assign an item to a package
Step 6 Continue until items are packed, adding packages as needed.
Step 7 Once you are happy with the packaging selection, move to the next step by assigning a carrier and service level. If a carrier and service level has already been assigned, you can finalize the packaging and carrier assignment by selecting Book & Print. Alternatively, you can create a shipment without booking with a carrier.
Create Shipment without Booking
There are times when it is necessary to create an unbooked shipment. This is most likely to occur when you need to change the details of a shipment before assigning it to a carrier, or when you are unable to assign a carrier and don't want to lose the progress you have made with packing the shipment. To create a shipment without assigning it to a carrier, select Create Shipment, then select Save Without Booking. The shipment is assigned the New status and can be found in the Shipments screen when you are ready to book it.
 Select Save Without Booking to create a shipment without a carrier