Delivery Hub can automate your shipping processes, allowing you to manage operations by exception (often referred to as anomaly management) and keep your operations running smoothly. Most such errors that occur in Delivery Hub are caused by missing or incorrect data shipment data.
Find anomalies
If your organization automatically assigns shipments using Delivery Hub's API, you can focus on shipments that Delivery Hub could not assign to a carrier. Unassigned shipments usually mean that a carrier rejected the shipment or that its attributes did not match any shipping rules.
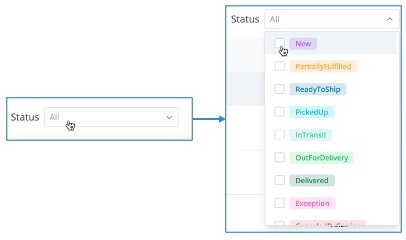
To find shipments that require attention, filter the Shipments table to display only shipments with the New or Canceled by Carrier statuses. Shipments with the New status do not have a confirmed booking with a carrier, and shipments with the Canceled by Carrier status had a successful booking but need reassignment.
Step 1 Go to the Shipments screen.
Step 2 Select the Status filter, then select the checkbox next to New and Canceled by Carrier.

Filter by shipment status
If you know that there is an issue with a specific shipment, you can search for it in the Orders, Fulfillments, or Shipments screens using any of the following details:
- Source ID
- Order name
- Shipment tracking ID
- Recipient name
- Recipient phone number
- Recipient email
- Fulfillment source ID
To open a shipment from the Orders or Fulfillments screen, open the relevant order or fulfillment and select the shipment.
Find shipments assigned to a specific carrier
You may need to resolve issues with shipments assigned to a specific carrier or service, for example if they alert you that they are experiencing a delay.
Step 1 Go to the Shipments screen.
Step 2 Select the Carrier & Service filter, then search for the relevant carrier and service and select one or more from the list.
Determine the cause of an anomaly
Once you have a list of exceptions, select a shipment to begin investigating and resolving issues.
Step 1 Select the shipment's tracking number to access the details screen.
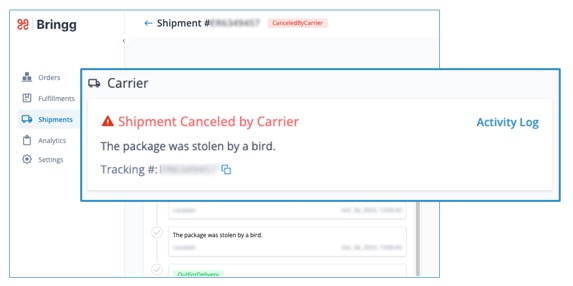
Step 2 Check the most recent rejection or cancellation reason listed in the Carrier card.

View the most recent carrier message in the shipping details screen
When available, the payload including the rejection response from the carrier is also included in the activity log.
Resolve errors
Authentication failed
Authentication errors occur when the carrier cannot approve Delivery Hub's access to a shipping account. To resolve these errors, ask your administrator to update your credentials in Settings > Shipping Accounts.
Validation failed
Many carrier errors are related to validation errors, which means that some of the data they received from Delivery Hub needs to be added or correctly formatted.
To address validation issues, confirm the formatting and accuracy of the recipient and sender's address and phone number fields.
Here are a few examples of phone number formats that Delivery Hub accepts through the API:
- +123-456-7890
- (123) 456-7890
- 123.456.7890
Learn more about required fields and validations.
Address not in carrier range
If you receive an error message stating that a shipment is out of the carrier's service area, this may be because the recipient address is incorrect. Update the address and try to book the carrier again. Learn more.
If all addresses are correct, reassign the shipment to a carrier that serves the recipient's location. If you need help deciding which carrier to select, contact your administrator for a list of relevant carriers. Learn more about reassigning shipments.
Resolve anomalies without error messages
There are a few steps you can take to resolve an error when there is no error message from the carrier or when the error message is unclear.
- Try to book the same carrier and service again. Carriers occasionally have delays or downtime, resulting in rejected shipments. A second attempt may be more successful.
- Confirm that all required sender and recipient fields are filled. Learn more.
Contact your administrator or Bringg support representative if these solutions do not resolve your issue.