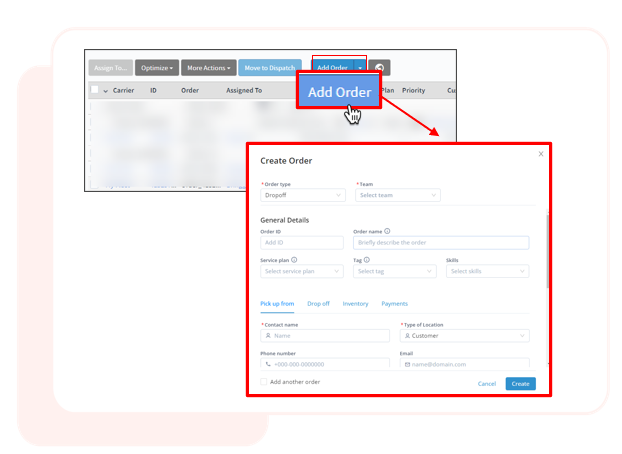
Manually add new orders to Bringg easily to begin the route planning and dispatch process. Include key destination, inventory, and other order data to your records to ensure accurate and efficient order assignment and delivery. Create orders with either a single destination or both a pickup and drop off location (waypoint).

Note
The manual create order flow does not yet support linked orders (tasks).
You can also add orders to Bringgvia API. Learn more.
Before You Begin
Confirm you have a user of type Admin.
For dispatchers to add orders, enable the Create Orders permission under Privileges.
Verify your order details.
Access Manual Order Creation
Access the manual order creation form from either Planning or Dispatch > Add Order.
Add General Order Details
Step 1: (Required) Select the Order type that best suits the use case.
Order Type | Use |
|---|---|
Drop off (two stops) | (Default) For delivery orders with two locations (waypoints), one where the driver picks up the order (like a warehouse or distribution hub), and the other where the customer wants it to arrive. |
Drop off (one stop) | For delivery orders with a single location (waypoint), where the customer wants it to arrive. |
Pick up | For orders where the item will be picked up from the customer location. |
Exchange | For orders when one or more items are being dropped off, and another item is being picked up instead. For example, when installing new appliances and hauling away older ones. |
The form loads additional tabs and fields based on the order type selected.
Step 2: (Required) Assign a Team to fulfill the order by selecting from the menu.
Note
The user assigning the team to the order can only select from among teams to which they already belong.
Selecting a team automatically populates the Pick up from tab with the relevant team location details by default. To change the pick up location details, adjust the Type of Location field first. See below.
Step 3: Enter the general order details.
Field | Description |
|---|---|
Order ID | Your external system’s ID for the order. |
Order name | The title or brief description of the order. Maximum length of 255 characters. |
Service plan | The name of the service plan, like basic or premium. Learn more. |
Tag | Defines the customer-facing notifications and styling, cancellation options, and driver actions for orders associated with this service plan. |
Skills | An array of driver skills or vehicle capabilities required to carry out this order, such as "fridge installation". Learn more. |
Provide Location Details
Add the applicable details associated with the pick up or drop off, depending on the order type.
Field | Description |
|---|---|
Contact name | (Required) The name of the contact person associated with the specific location. For example, the deliver location is often the name of the customer who placed the order. |
Type of location | (Required) Indicates the location type (kind) of the given location (waypoint). Options include:
|
Phone number | The phone number of the contact associated with the specific location. |
The email address of the contact associated with the specific location. | |
Address | (Required) The address of the specific location. For example, the team location address for a pick up, or the customer’s home for a home delivery. Maximum length is 255 characters. |
Address line 2 | Additional address information, if needed. For example, apartment or suite number. Maximum length is 255 characters. |
Destination ID | ID of the record of the contact name. It can use External ID or Bringg ID . |
Time window | Define the date and time frame in which the order must be picked up or dropped off, if needed. |
Instructions for driver | Add any free text notes that give the driver specific instructions. For example, provide key landmarks or indicate if the order can be left outside the door. |
Assign a Driver
Immediately assign a driver to fulfill the order.
Note
A driver can also be assigned following the order creation, through the Planning and Dispatch process.
Add Inventory Details
Define the inventory items to be picked up or dropped off at each location.
Field | Description |
|---|---|
Item name | A brief description of the inventory item. |
Inventory ID | This can be either the sku or your (external) id for the inventory item. |
Scan code | The number to be scanned on the inventory label. |
Quantity | The amount of the inventory item ordered. |
Height/Width/Depth/Weight | The dimensions of the single inventory item. Whether units are metric or English varies by configuration. |
Price | The price charged for the inventory item to the customer who placed the order. |
Include Payment Information
Add the payment details in Payments. Indicate if the payment will be made in cash.
Complete the Order Creation
To add more orders, select Add another order > Create. To add only the existing order, only select Create.
View Details in Order Page
Once you Create the order, you can return to Planning or Dispatch and search the order to view all details on the order page.