You can make targeted changes to an optimized route, like adding unassigned orders to a specific point in a route, using the route planner.
For example, you may run route optimization each evening to prepare the warehouse staff and vehicles for the next day, but you allow some VIP consumers to continue placing orders. The next morning, you can check the location of any new orders using the route planner map, so you can locate a route running nearby. Then add each new order to a route in the correct place using the timeline. Send the routes to dispatch, and continue adding VIP orders as they come in, to fulfill all orders together.
Each time you run route optimization on the same group of orders you may well receive a different result, as there are multiple ways to organize the same group of orders into efficient routes. Instead of reshuffling all orders each time, build on your existing plans by making focused changes where they are required using the route planner. Experiment with adjustments, and check how they impact route metrics by comparing the route KPIs.
Use the route planner to:
- Move all unassigned orders in a team to a route, such as last minute orders or orders Bringg could not assign automatically.
- If you feel that too many orders are not assigned, discuss changing the route optimization settings with your ops manager.
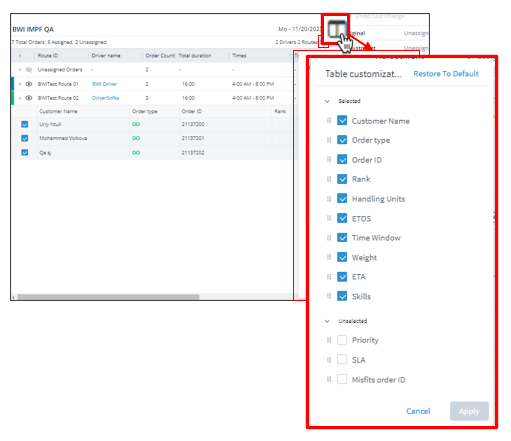
- Choose which order details you wish to see front and center by selecting and arranging the appropriate columns.
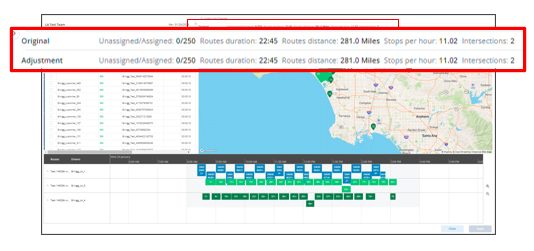
- Experiment with moving orders between optimized routes to see how the changes may impact route metrics like route duration, distance, stops per hour, and intersections between drivers. Learn more.
- Move one or more order(s) from one route to another. For example, if one driver is delayed during their route you can move some of their orders to another driver whose route runs nearby.
- Change the sequence of orders in a route, for example, if a customer requested their order be delivered a bit earlier than scheduled.
- Unassign orders from a route. For example, unassign one if a customer requests an order be delivered on another day, or several if the driver needs to finish their shift earlier than anticipated.
- View routes per date within a range of dates when using multi-day optimization. Learn more.
Before You Begin
- Confirm you have a user of type dispatcher (or admin).
- Generate optimized routes for planned orders. Learn more.
Procedure
Step 1: Open Bringg and navigate either to:
- Planning to adjust routes before you dispatch them.
- Dispatch > List to adjust active routes.
Step 2: Select at least one route you wish to change and any unassigned orders you want to assign.
We recommend selecting all routes belonging to a team, so you have the entire picture when making your changes. To easily select entire routes, select Group by on the upper right corner and choose any option that includes Route.
When working with multiple teams, group the options in Dispatch or Planning by any option that includes Team. We recommend by Team & Route.
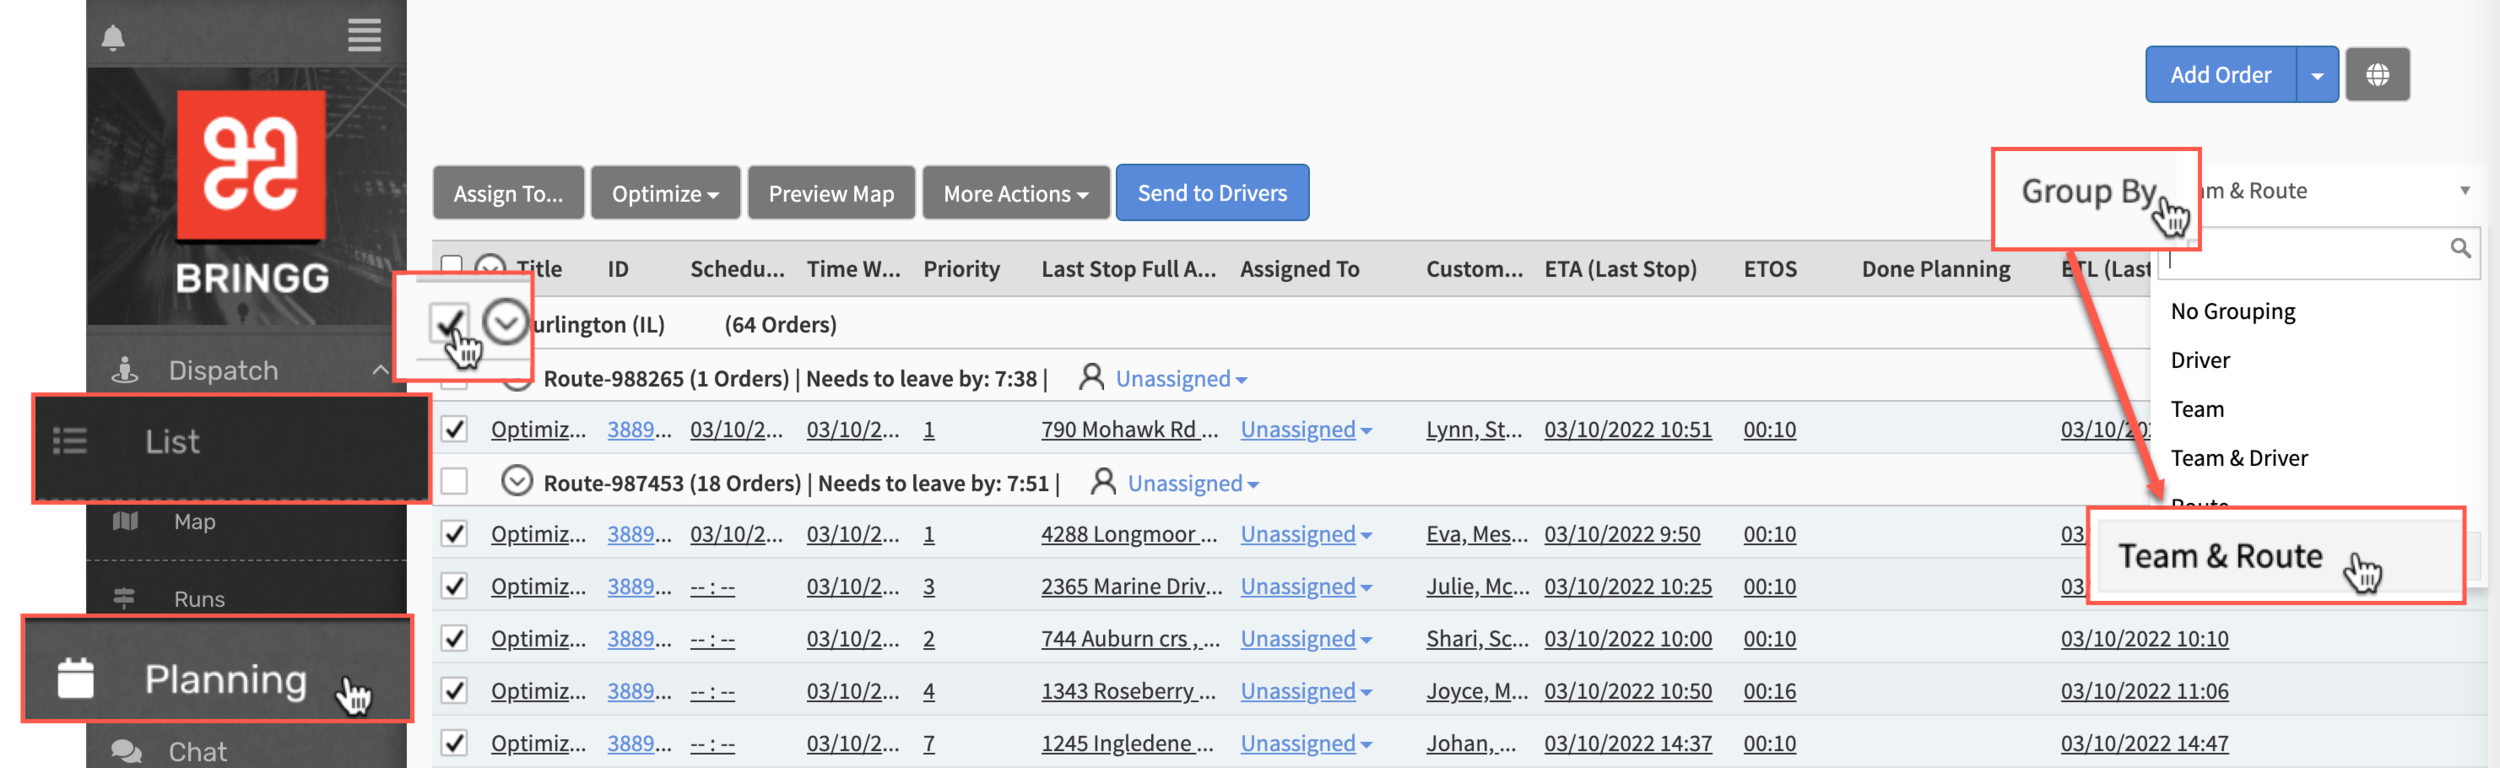 Select the routes and unassigned orders you want to adjust
Step 3: To view and adjust the selected routes and orders, select Route Planner.
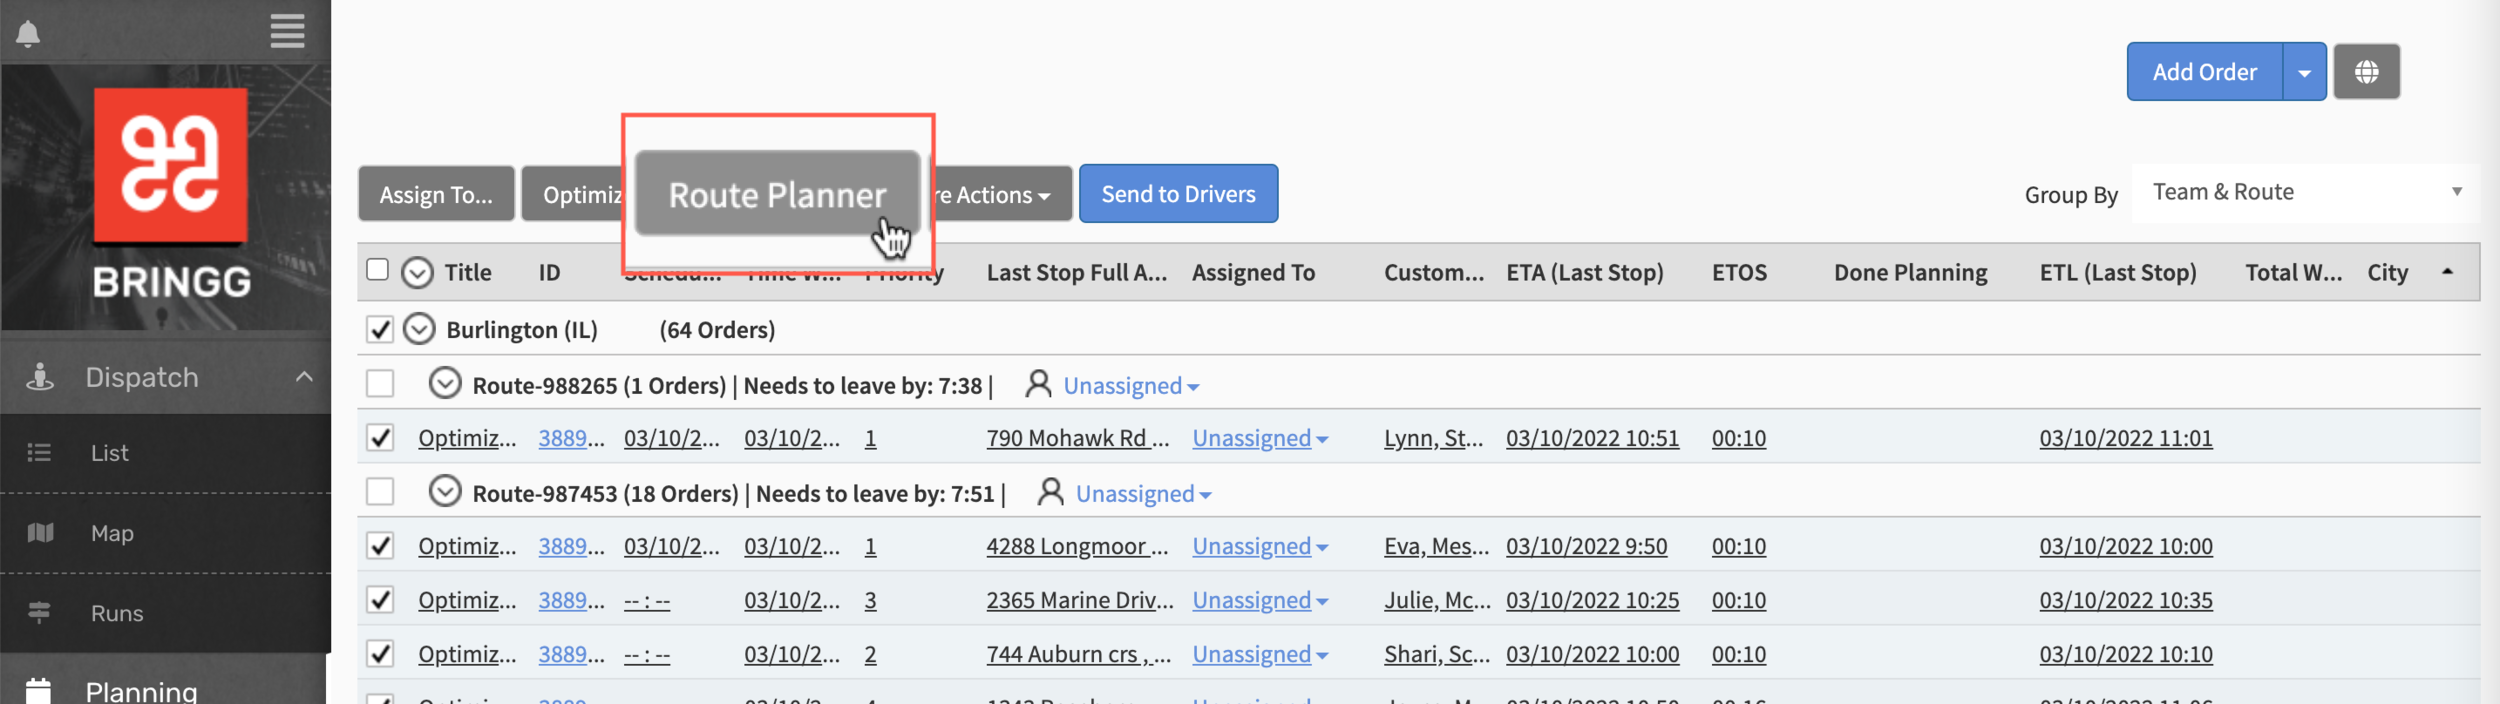
View and adjust the routes and orders you selected in the route planner
Step 4: View routes and unassigned orders on the map and timeline to decide what changes to make.
For example, identify an unassigned order on the map to see routes running in its proximity. Confirm which routes can accommodate the order's requirements by checking the order and route details, such as skill and weight/capacity. Then look at the eligible routes in the timeline to see which has a free space during the order's time window.
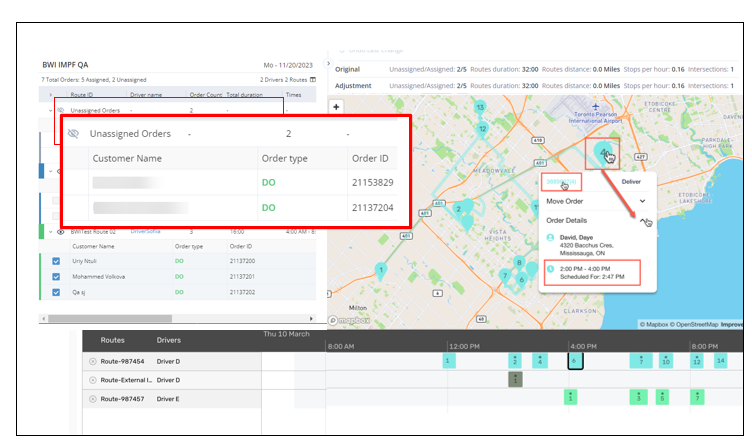 Identify an order on the map to find routes nearby
|
To... |
Do this... |
|---|---|
| View specific order details in the list |
|
|
View all unassigned orders on the map |
Select Unassigned Orders in the left hand panel, to view them as pins marked with an X on the map.
|
|
Identify a specific order on the map |
|
|
Zoom in and out on a cluster of orders |
On the map, zoom in and out by using the + and - buttons on the top left, or use your keyboard shortcuts.
Tip
When order destinations overlap on the map, you see a number that represents the position of one of the destinations in the route.
On the timeline, * indicates a cluster of orders. You can zoom in using the zoom icon If you see the * on a fully expanded timeline, these are multiple orders for a single destination. Select the tile again to view the details of each order at this destination.
.png) Expand the timeline or map to view each order's details Expand the timeline or map to view each order's details
|
|
View routes on the map |
Select the route's eye icon |
|
View the details of an order |
Confirm the order's Time Window so you can look for a route that does not already have orders scheduled at that time. |
|
Find a route with availability during an order's time window |
Scroll horizontally on the timeline to find a route with free space in the order's time window. |
.gif)
 , or your keyboard shortcuts, or you can select the cluster to expand the timeline.
Step 5: Build your routes further.
|
To... |
Do this... |
|---|---|
|
Move an order into a route |
Tip
Priority indicates an order's position in a route.
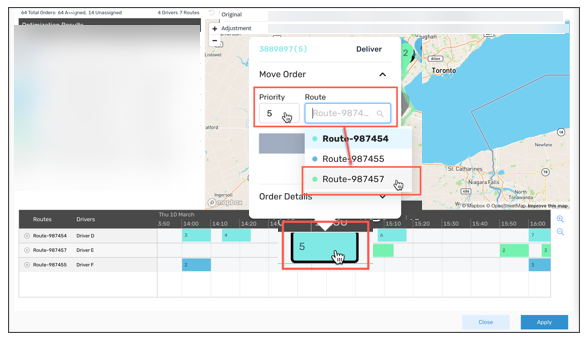 Choose a new route and position within the route in the pop-up Choose a new route and position within the route in the pop-up
|
| Evaluate the quality of adjustments you want to make to a route |
After moving one or more order(s) between routes, check the route KPIs to see how the changes impact the route metrics. For example, check if moving an order from one route to the other impacts the total duration of all the routes. Learn more. |
|
Assign a route to a different driver |
Select the driver's name in the left hand panel. Learn more. |
After your action, Bringg makes small adjustments to the route to accommodate the change, such as moving each order to a slightly different time in its time window and changing the sequence number of the remaining orders in the route. If you see a red clock icon on one of the orders in the timeline, it indicates that your change caused it to move outside of its time window. You can review these changes in the route's timeline and map to confirm that they improve the route.
Step 6: Adjust routes as needed.
- Select one or more orders at a time either from the list or timeline view. To select multiple orders from the timeline, use Shift, or Ctrl (PC) or Command (Mac).
- Choose an action from menu.
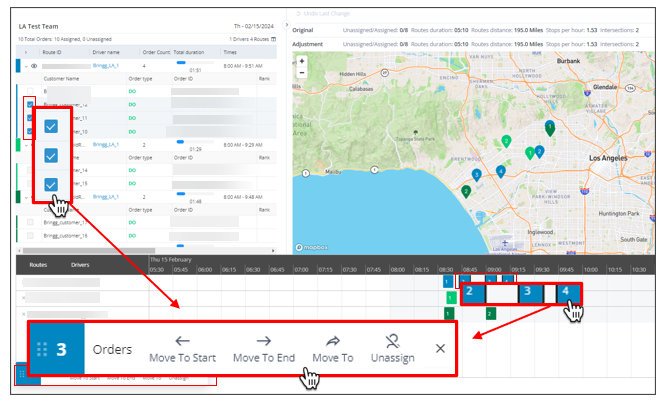 Move multiple orders within or between routes, or unassign them as needed.
| Action | Description |
|---|---|
| Move to Start | Relocates the selected orders to the start of their existing route while maintaining their sequence. |
| Move to End | Relocates the selected orders to the end of their existing route while maintaining their sequence. |
| Move to | Allows you to move the selected orders to another route belonging to the same team.
Tip
When moving orders to another route, you can select where in the route to insert them, maintaining their existing sequence.
|
| Unassign | Removes the selected orders from the route and returns them to being unassigned. |
Step 7: If you regret the last change you made before you selected Apply, select Undo last change on the top left of the map.
The last order you moved appears with a bold outline in the timeline. Review each change before moving to the next, as you can only undo the most recent change.
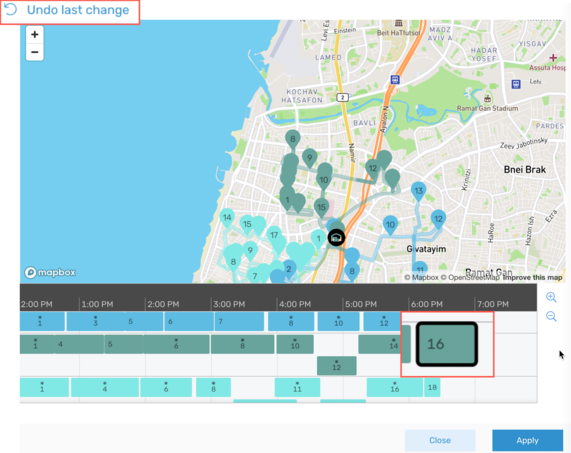 Undo latest change if it does not improve your route
Step 8: Select Apply on the pop-up or the bottom right corner of the route planner for your changes to take effect.
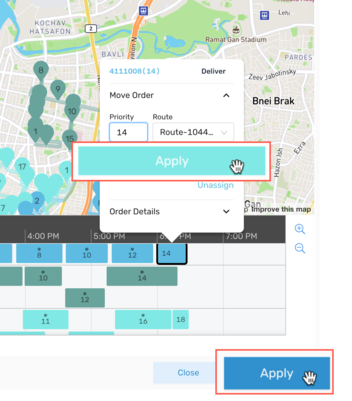 Select Apply to save your changes