You can quickly find and resolve delivery problems by checking Bringg's alerts, allowing you to manage operations by exception, act fast and keep your operations running smoothly.
An alert is Bringg's way to tell you there is a problem with the fulfillment process, enabling you to trust Bringg's automated processes for most cases, and focus instead on . You can check alerts about the order itself, about the driver, or relating to the automatic route creation process (route optimization).
For example, you can quickly see all orders which drivers had canceled, or all orders which took too long for drivers to accept, and quickly check if those difficulties are concentrated with one specific team.
An ops manager can add custom alerts if needed, and customize the way Bringg sends them (learn more). The alerts themselves don't resolve problems; they alert you to a potential issue which you should independently resolve, and then you can dismiss them to remove them from the list.Set Up Alerts
Procedure
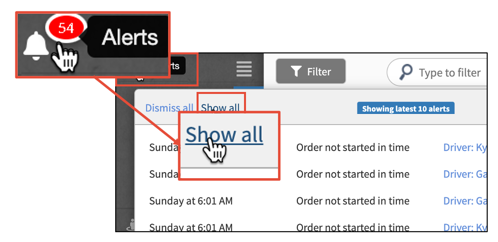
Step 1: Open the window of real-time alerts by selecting Alerts> Show All from any screen.
Open the alerts window
The screen automatically refreshes whenever new alerts arrive.
Step 2: Choose the types of alerts you want to view:
Choose the types of alerts
Select Order Alerts to view alerts associated with a specific order, like an order being late, or that it's taking too long for an order to be assigned to a driver, or perhaps there's a change in the pickup time which you need to tell the driver.
Select Driver Alerts to view alerts associated with driver connectivity, like a low battery warning, disabled GPS, or phone no longer responsive.
Select Optimization Alerts to view issues which arose when running Bringg's route optimization, like an order was not added to a route, or a notification that it is creating less than ideal routes because there were not enough drivers available.
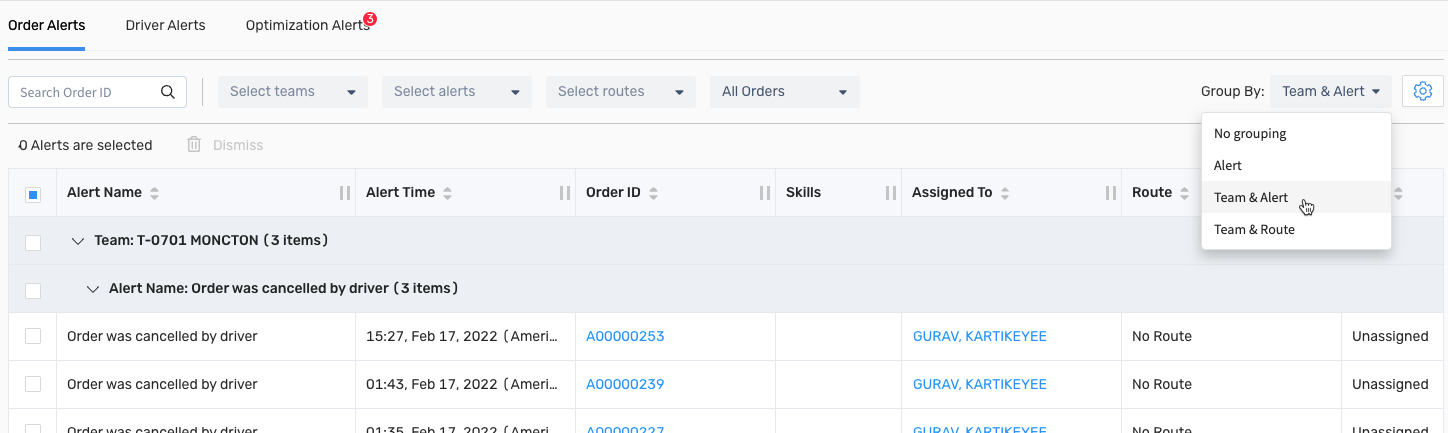
Step 3: Find the alerts you need by filtering, sorting by any column, grouping, or adding more columns as required.
View alerts as a flat list or group them for easier navigation
Tip
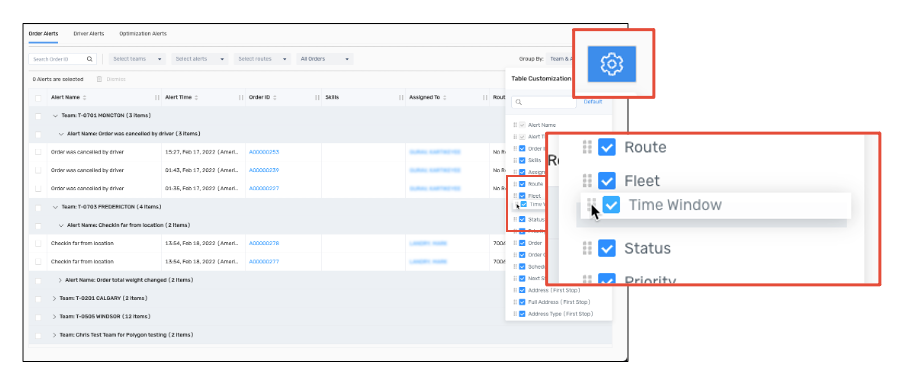
Alerts can have dozens of attributes, each represented by a column in the table. Scroll to the right to see all the data on each alert.
To...
Do This...
View an alert for a specific order
Enter the order ID in the search box on the top left of the screen.
View more data (attributes) about each alert
Scroll to the right to see more columns (attributes) of each alert.
You can add or remove columns by selecting Settings on the top right, then selecting or deselecting the column names you need to see.
You can make the important attributes visible without constantly scrolling to the right, by changing the order of the columns. Select Settings on the top right, then use the handle icon to the left to drag an attribute higher up on the list to make it more visible.
Customize your alerts view to show the best attributes without scrolling
Find a specific alert name
Use the Select alerts filter on the top row to view only alerts of a specific name. Then further refine your list by sorting on another column or employ additional filters.
Group alerts by their name by selecting Group By > Alert or Team & Alert.
Find an alert for specific teams
Use the Select teams filter on the top row to view only alerts about a specific team. Then further refine your list by sorting on another column or employ additional filters.
Group alerts by their name by selecting Group By > Team & Route or Team & Alert.
Sort by the Alert Name column. This works best with fewer alerts, to require less scrolling.
Find an alert for specific routes
Use the Select routes filter on the top row to view only alerts about a specific route. Then further refine your list by sorting on another column or employ additional filters.
Group alerts by their route by selecting Group By > Team & Route.
Sort by the Route column. This works best with fewer alerts, to require less scrolling.
Step 4: (Optional) Notify other dispatchers that you have taken responsibility to resolve an alert by selecting Take Ownership, to add your username as the Alert owner.
To relinquish responsibility for an alert, hover over your username and select Remove ownership.
Take ownership of alerts you are working to resolve
Tip
Taking ownership of an alert for an order with multiple alerts, adds all the related alerts to your ownership.
Step 5: To remove alerts because you have resolved them, you can dismiss them by selecting their check boxes, then selecting Dismiss.
Alerts do not resolve problems; you do. After you have dealt with the issue, or if you simply took it as an FYI, you can dismiss the alert to remove it from the list.
If the alert has an owner, only the alert owner can dismiss it.
Tip
To quickly dismiss multiple alerts with just two clicks, we recommend grouping them together with the Group By menu, then selecting the group heading to select all its alerts.
Select alerts to perform bulk actions like dismissing them together
The Bringg Platform is the leading cloud provider for delivery and fulfillment, helping you scale and optimize your last mile delivery operations and omnichannel customer experiences. With a real-time view of the delivery process, you get the visibility you need to ensure goods and services reach consumers safely, affordably, and on time.
Bringg empowers a collaborative ecosystem, putting the power back in your hands to drive exceptional delivery experiences at minimum cost.
Bringg helps you make fast, accurate decisions by alerting you to potential problems before they become larger issues, and presenting the information needed for you to react. With Bringg, you can fulfill orders efficiently, with more peace of mind, and better consumer satisfaction.
Bringg helps you keep pace with consumers' growing demands by offering them flexible options like express shipping, Click & Collect, green delivery, and the ability to schedule delivery when they choose.
With Bringg 's Delivery Hub you can access a diverse global network of 300+ delivery providers to expand your business and meet changing market demands. Learn more.
Increase efficiency with optimized routes and AutoDispatch, and keep track of your overall performance with real time report data.
An order is a request for the fulfillment of goods and services at a specific address. It includes all information needed to complete it, such as the requested service or goods, the customer’s contact information, required services (such as fragile care), and the time window.
A route is a sequence of destinations from one or more orders. Bringg can automatically create routes by calculating the fastest and most efficient route which fulfills the orders. Bringg can also help you assign the most appropriate vehicle and the driver with the correct skills to complete the order.
There are two types of routes:
A planned route is a route containing planned orders that you create in advance, either manually or using route optimization. For example, you can run route optimization every day at 10pm so that drivers can start their routes when they start their shifts the next morning.
An on demand route is a route which contains on demand orders that you create on the fly by using Autodispatch (AD), which continuously and automatically assigns orders to a team's drivers, vehicles, and routes. Common examples are deliveries for restaurants, grocery and pharmacy stores, or roadside assistance.
After you dispatch the orders in a route, drivers receive their route in their Driver App as a series of destinations, each with their associated order which they pick up or hand off to the consumer.
Run Bringg's route optimization (RO) to reduce costs by organizing your orders into the fastest, most efficient planned routes, where each order arrives at its destination within its designated time window. If you have an Own Fleet, RO can also assign each route to a vehicle or driver who is available at that time and has the correct skills to fulfill the orders. You can configure RO with preferences like the maximum length of a route, the time on site (TOS), the time to load the vehicle, predicted and real time traffic patterns, and so on.
For example, you can ask to set route optimization (RO) to limit the number of destinations on a route, or to use the minimum number of vehicles in a route.
Each time you run route optimization on the same group of orders you may well receive a different result, as there are multiple ways to organize the same group of orders into efficient routes. Instead of reshuffling all orders each time, build on your existing plans by making focused changes where they are required using the route planner.
You can run RO manually or automatically at set days and times, for select teams or across the entire organization.
On demand orders typically use AutoDispatch (AD) instead.
Was this article helpful?
Thank you for your feedback! Our team will get back to you
 Open the alerts window
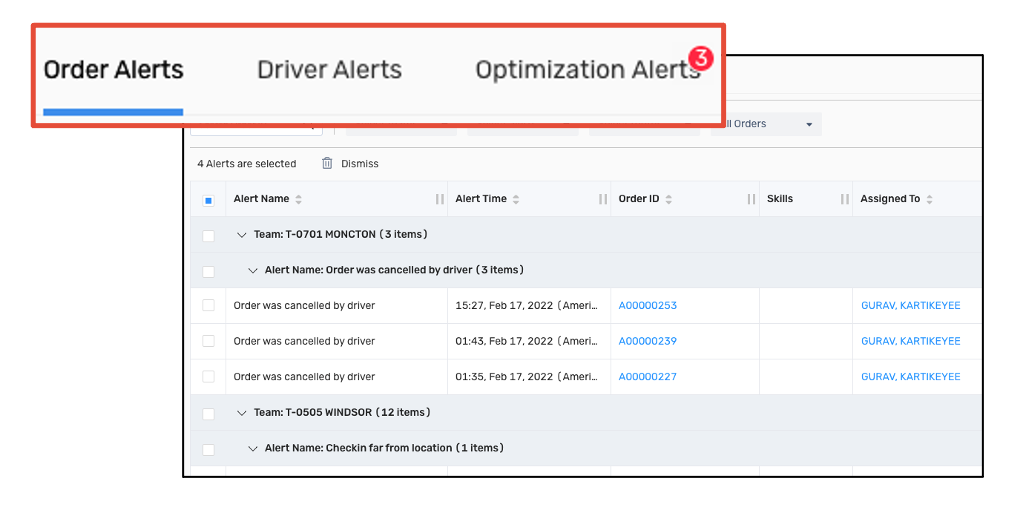
 Customize your alerts view to show the best attributes without scrolling
 on the top right, then selecting or deselecting the column names you need to see.
 on the top right, then use the handle icon
  to the left to drag an attribute higher up on the list to make it more visible.
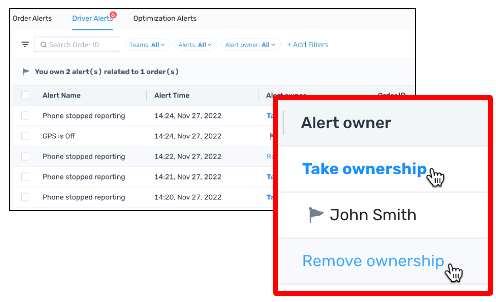 Take ownership of alerts you are working to resolve
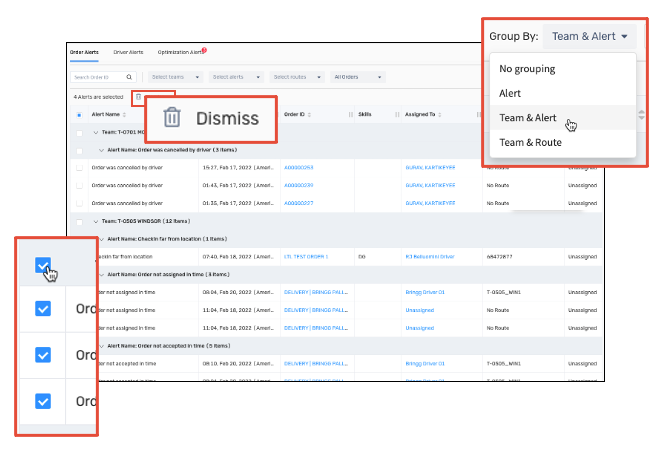 Select alerts to perform bulk actions like dismissing them together