As the IT integrator of a carrier, you can integrate your systems with the Bringg Platform to receive orders from shippers by adding Bringg's APIs and webhooks to your systems. Use the Bringg Integrations Portal to discover the APIs and webhooks needed, and access a dedicated staging site for you to test your integrations before going live.
Once you finish planning your integrations together with your business manager as well as with Bringg, map the names of your objects and fields with those Bringg uses. Then use the Integrations Portal to set up the Bringg APIs and webhooks. Once you have completed the set-up process, continue to the next topic to begin testing in staging and production.
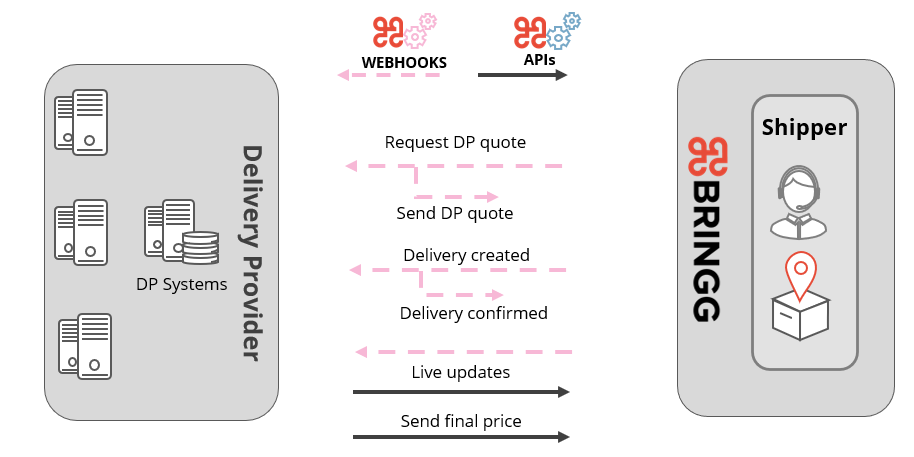 Implement your Bringg integration to partner with shippers
For example, set up an endpoint to receive webhook notifications from Bringg when a shipper creates, updates, or cancels a delivery request.
Before You Begin
- Contact your Bringg customer service representative to verify your login credentials to the Bringg Integrations Portal.
- Meet with your business manager to understand the data flows and their triggers between Bringg and your enterprise systems.
- Identify the technical capabilities you support such as quotes, driver location updates, proof of delivery, multi-package shipment, and so on.
Procedure
Step 1: Sign in to the Integrations Portal at fleet.bringg.com using the credentials Bringg gave you.
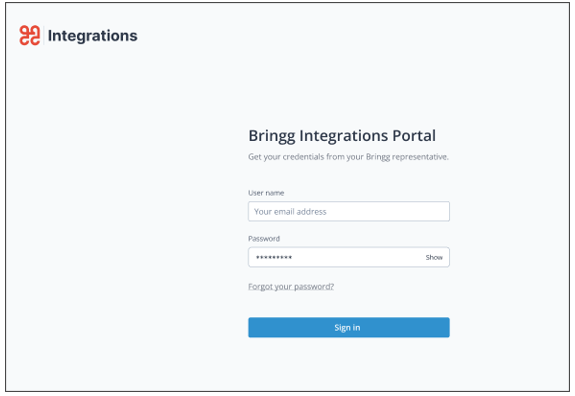 Open the Integrations Portal
The Integrations Portal includes a unified implementation platform for both staging and production, step-by-step guidelines outlining the integration process, and access to all the necessary keys and endpoint URLs.
Step 2: Review the API calls and webhooks Bringg used in the context of sample delivery flows, like happy flows as well as canceled and returned items.
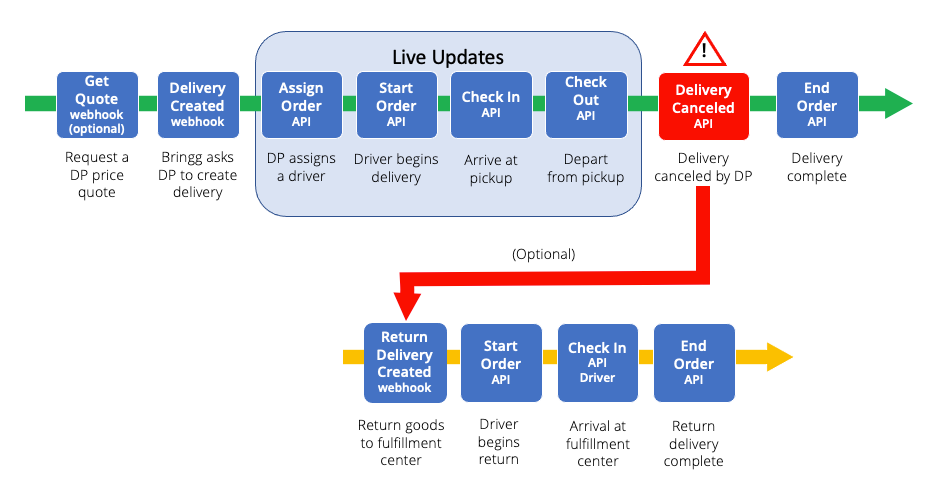 Understand Bringg APIs and webhooks within different flows
Step 3: Perform a detailed analysis with your colleagues from business and operations to identify the events which trigger a Bringg API or webhook, and identify the correct API or webhook to implement your integration.
When this happens... | Trigger this event... | Transfer this data... | Direction of flow |
|---|---|---|---|
Request API authorization | Get Token (API) | You request an authorization token from Bringg using the Client ID and Client Secret for a particular shipper. Learn more. | carrier to Bringg |
New shipper registration | Merchant Registered (webhook) | Bringg sends you the identification information of a shipper who registers to work with you. Your IT integrator can then access their credentials in the integration sandbox. | Bringg to carrier |
You need to retrieve credentials of a shipper who registers to work with you | Get Merchant Credentials (API) | You want the technical credentials for the shippers who register to work with you. Learn more. | carrier to Bringg |
Shipper requests a quote | Get Quote (webhook) | (Recommended) Send a quote response with your estimated delivery price and your availability to complete the order. The shipper may also request details like ETA, ability to fulfill green delivery, and so on. | Bringg to carrier |
Shipper sends order | Delivery Created (webhook) | Bringg notifies you that a shipper wants you to deliver goods, so you create a delivery in your system with an identification and the terms of the delivery that you quoted. | Bringg to carrier |
You assign a driver | Assign Driver (API) | Share any authorized identification information about the driver who receives the assignment or reassignment. The shipper passes this to consumers for better customer experience, added feeling of safety, and so on. This is also where you can add a cost to the order once you know who is delivering it. | carrier to Bringg |
Driver starts the delivery | Start Order (API) | Notify Bringg that the driver has begun the delivery process. Include the location, time, delivery price, and whether or not it is a green delivery. | carrier to Bringg |
Update driver location | Update Driver Location (API) | (Recommended) Share the timestamp and exact geolocation of the driver. | carrier to Bringg |
Driver arrives | Check In (API) | (Recommended) Share the timestamp and exact geolocation of the driver upon arrival at either the pickup or dropoff location. | carrier to Bringg |
Driver adds information | Add Note (API) | (Recommended) Update the order when the driver adds a note, signature, proof of delivery, or any other delivery documentation the driver collects. | carrier to Bringg |
Driver leaves | Check Out (API) | (Recommended) Share the timestamp and exact geolocation of the driver as they leave the pickup location. Upon leaving the dropoff location, use the Complete Order API instead. | carrier to Bringg |
Shipper cancels order | Delivery Cancelled (webhook) | Bringg notifies you that the shipper canceled the order and includes a reason why, like if the customer decides to cancel it. This helps you know you can end a delivery immediately and avoid wasting time and resources. | Bringg to carrier |
You cancel order | Cancel Order (API) | Cancel a delivery, like if the customer is not home, or there are no available drivers. | carrier to Bringg |
You update order | Update Order (API) | (Optional) Update the scheduled pickup or delivery time, the time window, driver ETA, green delivery, delivery price, and so on. | carrier to Bringg |
Shipper updates order | Delivery Updated (webhook) | The shipper makes changes to the address, goods, time window, or customer information. | Bringg to carrier |
Driver completes order | Complete Order (API) | Send the timestamp, delivery price, order number, or geolocation of the driver when you complete the delivery. | carrier to Bringg |
Bringg creates return delivery | Return Delivery Created (webhook) | (Optional) The Shipper requests that your driver take the inventory item back to the fulfillment center, so it creates a new delivery with the same order id. | Bringg to carrier |
Driver arrives at or leaves bulk pickup location | Cluster Checkin/Checkout (API) | (Optional) Do a bulk pickup of orders from a fulfillment center or other similar location and deliver them to your warehouse or store location. | carrier to Bringg |
Step 4: Find the API keys for your testing shipper sandbox in Registered Merchants.
Each shipper has a separate API key for their staging and production accounts respectively. The key appears in the header of all webhooks that Bringg sends you so that you can identify from which shipper they originate.
 Copy the API key for the sandbox shipper to test webhooks.
Step 5: Set up the endpoint URLs to listen for webhook events from Bringg.
Step 6: Enter your endpoint URLs for each webhook Bringg sends you. This includes mandatory as well as optional webhooks you listen to.
For example, enter a staging and production endpoint URL for when Bringg notifies you when any shipper creates a delivery for you to fulfill.
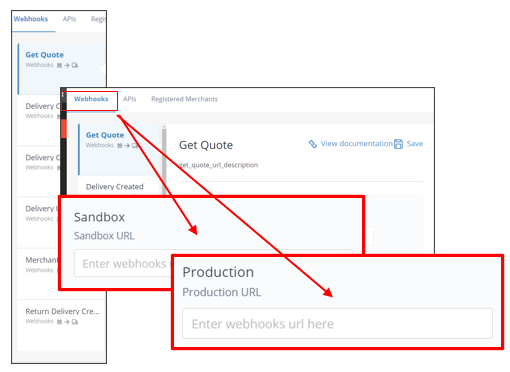 Input endpoint URLs for each environment you use
Step 7: Copy the Bringg API endpoints for any calls you send Bringg as part of the delivery flow, including common API calls as well as those used only in edge cases.
Include URLs for recommended technical capabilities like driver location updates.
For example, copy the endpoints for when you assign a driver to a delivery or when the driver is unable to complete a delivery and cancels it.
Check Registered Merchants > Endpoint Prefix to verify which Bringg URL aligns with the Bringg environment the sandbox shipper uses. Once you complete the end-to-end testing using your sandbox shipper, you will do the same to set up implementations with other registered shippers.
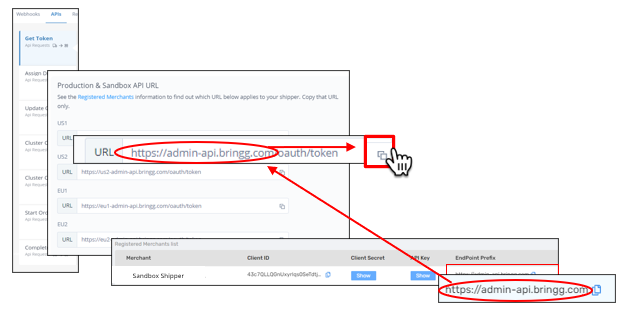 Select the URL corresponding to the Bringg environment the shipper uses
Step 8: Configure the JSON payloads for webhook responses and API calls. Learn more.
For example, send this payload when assigning a delivery to a new driver.
{
  "task_id":123456,
  "user": {
     "external_id": "driver1",
     "name": "Driver Name",
     "profile image": "https://url.to.image",
     "phone": "+15555555555",
     "email": "driver@fleet.com"
 },
  "delivery_cost": 1299,
  "green_delivery": true
}Step 9: Begin testing your integrations using the simulated sandbox shipper in the Integrations Portal to prepare for testing with active shippers and going live. Learn more.