To create a package’s label inside Bringg, send an API request for a label, with details of the package, like its weight and dimensions. Bringg can generate different labels for each carrier.
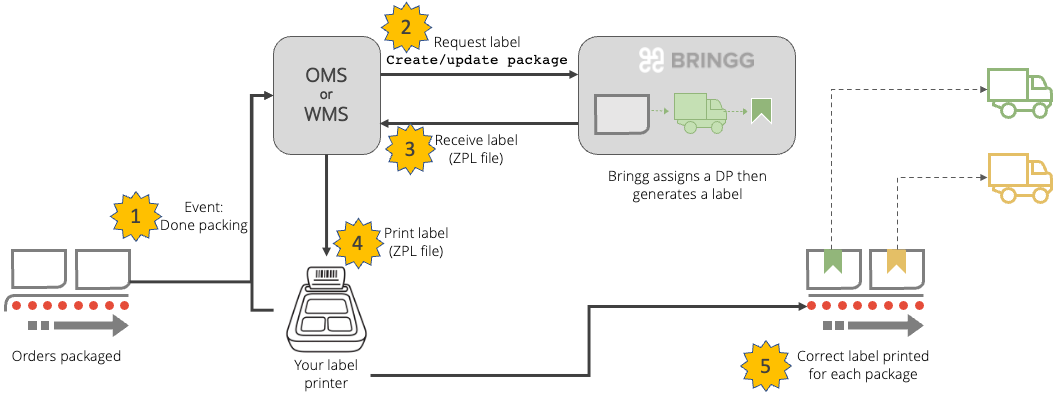
Typically, the label would also contain data from the order (like the delivery address), which you can source directly from Bringg. Typically an event like “done packing” would trigger the label API call (create/update package) in your warehouse management system or order management system.
 Steps to generate package labels automatically in Bringg
For example, when someone in your warehouse packs inventory for delivery, they enter the dimensions of the package in your system and press a “done packing” button. You can use this event to trigger the create/update package API call to Bringg (learn more), sending the order ID and other package details. The API returns the label for this package as a ZPL file (learn more), to be sent to the printer. The printed label is then attached to the package.
Before You Begin
Make sure you have a label printer which supports ZPL files (learn more). The printer should be connected to one of your systems (like OMS, WMS, ERP etc), which you can access via APIs. The printer can be connected wirelessly or physically.
Procedure
Step 1: Work with your ops manager to create each label template using a ZPL editor/viewer (learn more).
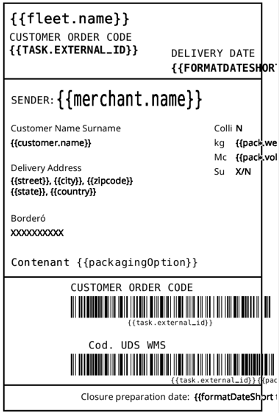
Labels include fixed content (like a logo or company name), and variable content (like a delivery address or package weight). As you construct your ZPL template, create variables by entering the Bringg field names in double curly brackets. For example {{merchant.name}}.
 The ZPL file produces the label layout
Step 2: If your ops manager requests to add specific details to the label, map each variable to fields in the order and/or the package, and add them as a variable in the ZPL label file.
^BC^ to turn a regular text into a Code 128 barcode. Use ^BY to determine the width and height of the barcode. Learn more.Your ZPL file often includes the following fields:
Field | Source |
|---|---|
Company name or DP name | Fixed for all labels with this DP. |
Company logo | Fixed for all labels with this DP. |
Order ID | In Bringg this is the |
Date of delivery | From the order. |
Consumer name | From the order. |
Consumer address | From the order. |
Package weight | Known at packaging time. |
Package volume | Known at packaging time. |
Package height | Known at packaging time. |
Step 3: Send all template ZPL files to your Bringg CSM, and specify the designated carrier (fleet_id) for each ZPL.
Step 4: Choose the event in your system which triggers the API call to Bringg requesting the label for a package.
Typically, this is at the moment when the warehouse staff signal that a package has been completed.
Step 5: Use this event to trigger the create/update package API call toBringg (learn more).
Include the task_id or external_task_id and any package details in this call.Bringg sources the fleet_id from the order, to identify the relevant label template.
Step 6: Bringg sends the completed label as a ZPL file in its response.
The response is either a URL which opens the ZPL file, or an attachment in base64, which you can decode (learn more).
Step 7: Send the ZPL file to your label printer.
Step 8: If a delivery provider insists on generating the label themselves:
- Add the package details using the
create/update packageAPI call to Bringg (learn more). - Ensure this update triggers a webhook to update the carrier with the new package information (like the package weight).
- Bringguses the carrier’s APIs to receive the label directly from them, though the turnaround time is now dependent on the responsiveness of the carrier.