Test your Integrations with Bringg as a Carrier
- 19 Jun 2023
- 9 Minutes to read
- Print
- DarkLight
Test your Integrations with Bringg as a Carrier
- Updated on 19 Jun 2023
- 9 Minutes to read
- Print
- DarkLight
Article summary
Did you find this summary helpful?
Thank you for your feedback!
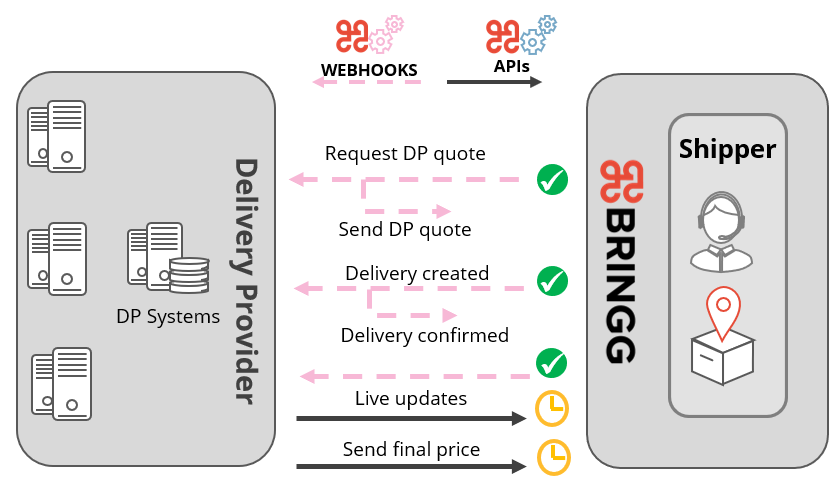
Once you complete the initial implementation of your Bringg integrations, use the Bringg Integrations Portal to thoroughly test and ensure the communication flow with shippers works effectively before going live. Simulate a shipper by creating test orders to verify that you configured your endpoints correctly. Test each API and webhook end to end, first using simulated orders in your Bringg sandbox account. Once Bringg certifies your integrations, implement and test them with your registered shippers as well, first with their staging environments, and eventually moving to production.
For example: check that you receive an event notification (webhook) when a delivery request is created in Bringg, and that Bringg receives an API call when your driver starts the delivery.
 Test your Bringg integration
Before You Begin
- Ensure you have added all the APIs and webhook endpoints to match your order delivery flows and capabilities, including standard (happy), cancellation, returns, or bulk pickup flows. Learn more.
- Coordinate with Bringg and registered shippers to ensure viability of end-to-end testing. Ensure that you have communication flows for each delivery scenario and that the shipper is ready to begin testing.
Procedure
Step 1: Sign in to the Integrations Portal at fleet.bringg.com using the credentials Bringg gave you.
Step 2: Begin with the sandbox simulation in the Integrations Portal by selecting Dispatch from the navigation bar.
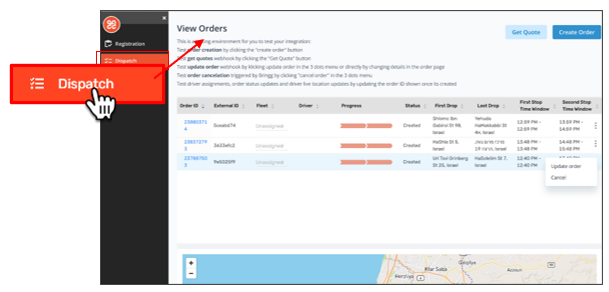 Navigate to Dispatch to begin testing your integrations
This page offers you a visualization of the order creation process using your own sandbox shipper account that triggers notifications to and from your system.
Step 3: (Optional) Select Get Quote to test that the Get Quote webhook request reaches the endpoint URL your provided to Bringg.
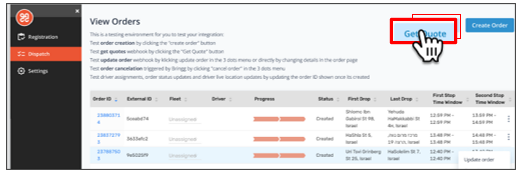 Activate and test the Get Quote webhook
If your integration works correctly, your company's system returns a response with the carrier quote details.
Choose this option only if your company supports carrier quotes.
Step 4: Review and edit the payload data to ensure the webhook sends the order information your system needs to see.
You can choose to select and edit fields from a default list of order fields, or paste your own custom payload in JSON or XML format.
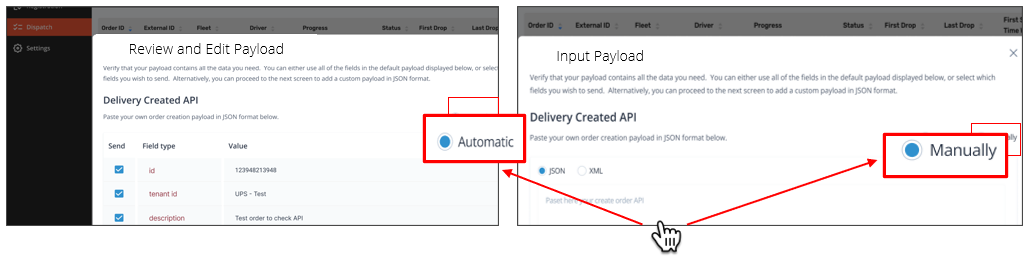 Select the fields you want to include or add a custom payload
Step 5: Select Create Order to start the sandbox shipper's delivery creation process.
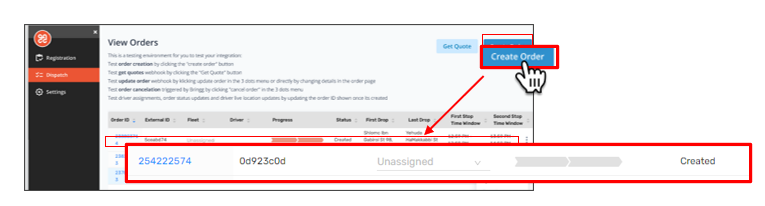 Simulate a shipper activating a delivery creation
Selecting this option generates a test order in the sandbox shipper account using two random geolocations within a set delivery radius taken from the sandbox shipper's address settings.
The order appears in the list on the dispatch page but remains Unassigned to a carrier.
Step 6: Select the order's row in the Fleet column to select your company as the carrier for that order.
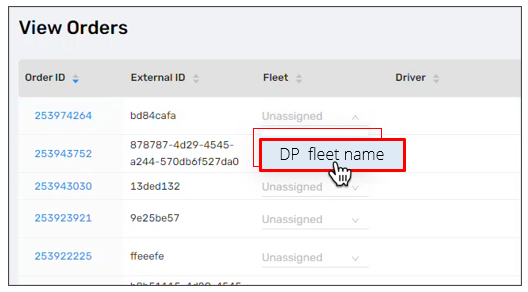 Assign your company as the carrier.
This sends the Delivery Created webhook to the endpoint URL you provided Bringg. Review and edit the Delivery Created webhook's payload data as detailed in this article.
In response to the webhook, verify that you send the delivery ID for that order from your system.
- Returning the correct response ensures the order remains assigned to you as the carrier.
- If you return an incorrect response, the order reverts to unassigned, indicating a problem with your integration.
Warning
Correcting this error is mandatory. Otherwise, any subsequent API call you make to Bringg will receive a 403 error response. Learn more.
Step 7: Use the sandbox shipper account to make changes to an order, or to cancel it.
This helps you verify that your own system receives the webhooks correctly and responds as needed.
To test this webhook event... | Do this... | So that... |
|---|---|---|
Delivery Cancelled (webhook) | Select the context menu | Bringg notifies you that the sandbox shipper canceled the order. |
Delivery Updated (webhook) | Select the context menu | The shipper makes changes to the address, goods, time window, or customer information. |
 and choose Cancel
Step 8: Test each API call by following the technical steps of order fulfillment from your company's own staging account to the sandbox shipper account.
Send this API call... | To... |
|---|---|
Assign Driver (API) | Share any authorized identification information about the driver who receives the assignment or reassignment. |
Start Order (API) | Notify Bringg that the driver has begun the delivery process. Include the location, time, delivery price, and whether or not it is a green delivery. |
Update Driver Location (API) | (Recommended) Share the timestamp and exact geolocation of the driver. |
Check In (API) | (Recommended) Share the timestamp and exact geolocation of the driver upon arrival at either the pickup or dropoff location. |
Add Note (API) | (Recommended) Update the order when the driver adds a note, signature, proof of delivery, or any other delivery documentation the driver collects. |
Check Out (API) | (Recommended) Share the timestamp and exact geolocation of the driver as they leave the pickup location. Upon leaving the dropoff location, use the Complete Order API instead. |
Cancel Order (API) | Cancel a delivery, like if the customer is not home, or there are no available drivers. To test this API, send it at any stage of the order fulfillment process. Note If the sandbox shipper enables the Failed Delivery Manager, you canceling the order can trigger the Return Delivery Created webhook which tells you to return the inventory item back to the fulfillment center. |
Update Order (API) | (Optional) Update the scheduled pickup or delivery time, the time window, driver ETA, green delivery, delivery price, and so on. |
Complete Order (API) | Send the timestamp, delivery price, order number, or geolocation of the driver when you complete the delivery. |
Cluster Checkin/Checkout (API) | (Optional) Do a bulk pickup of orders from a fulfillment center or other similar location and deliver them to your warehouse or store location. |
Step 9: Troubleshoot errors you encounter during testing to resolve integration issues.
For example, if you try to assign a driver to your fleet from the sandbox, and it returns a 400 error, check that you sent the order field as an integer rather than a string. Learn more.
Once you resolve all errors, contact your Bringg customer service representative to request that Bringg certifies your integration so you can begin working directly with a shipper staging account.
Note
Once Bringg connects you to the shipper staging account, you will see their credentials in Registered Merchants. These credentials allow you to begin testing directly with your shippers' staging accounts, and eventually to go live.
Step 10: (Optional) Automate the process of receiving shipper credentials directly to your company's system by listening to the Merchant Registered webhook.
- Copy the Get Merchant Credentials endpoint to make the API call.
Note
To obtain the endpoints of only one specific shipper, add the shipper's UUID from the payload of the Merchant Registered webhook to the end of Get Merchant Credentials endpoint. Learn more.
- Select Show Credentials under the Admin Credentials.
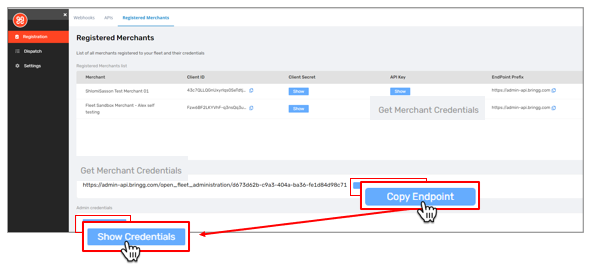 Get shipper credentials
 - Authenticate the call using Basic Auth Authentication. The username and password are the Client ID and Client Secret respectively.

| To... | Do this... |
|---|---|
| Automatically obtain the endpoints and credentials for all shippers who registered to work with you. |
Note To obtain the endpoints of only one specific shipper, add the shipper's UUID from the payload of the Merchant Registered webhook to the end of Get Merchant Credentials endpoint. Learn more.
|
Step 11: Copy shipper credentials to begin testing with their staging environments.
Field | Description |
|---|---|
Merchant | The name of the registered shipper interested in working with you. |
Client ID and Client Secret | Use these to generate a token to authenticate the API calls you are sending to the shipper through Bringg. |
API Key | Use this to authenticate the webhook notifications you receive from Bringg. |
Endpoint Prefix | This will differ based on the shipper's configuration with Bringg. Therefore, you need to verify that you are using the right prefix for each shipper. |
Step 12: Test and troubleshoot delivery flows end to end between your company's system and each shipper's staging, then production environments.
Contact your Bringg customer service representative to facilitate this process.
Once the integrations prove successful with the shipper's production environment, you are ready to go live.
Was this article helpful?