Assign a Different Driver for Orders on a Planned Route
- 19 Jun 2023
- 7 Minutes to read
- Print
- DarkLight
Assign a Different Driver for Orders on a Planned Route
- Updated on 19 Jun 2023
- 7 Minutes to read
- Print
- DarkLight
Article Summary
Share feedback
Thanks for sharing your feedback!
You can change the driver assigned to a planned route, merge routes, or extract orders from a route to create a new one. This is helpful for last minute orders or overbooked routes.
For example, if you receive last minute orders after running route optimization, you can assign them to a driver in an upcoming shipment. While you are assigning an order, Bringg indicates the drivers who are on shift and qualified to deliver it.
Tip
This can also help in the rare case when route optimization leaves orders unassigned.
Before You Begin
Confirm you are working with planned routes.
Procedure
Step 1: Open Bringg and navigate to Planning or Dispatch.
Step 2: Select at least one order or an entire route you want to reassign.
Tip
You can only reassign orders from/to drivers on the same team. We recommend grouping the orders by Team & Route to easily view the orders assigned to the same team, by selecting Team & Route in the Group By filter at the top right corner.
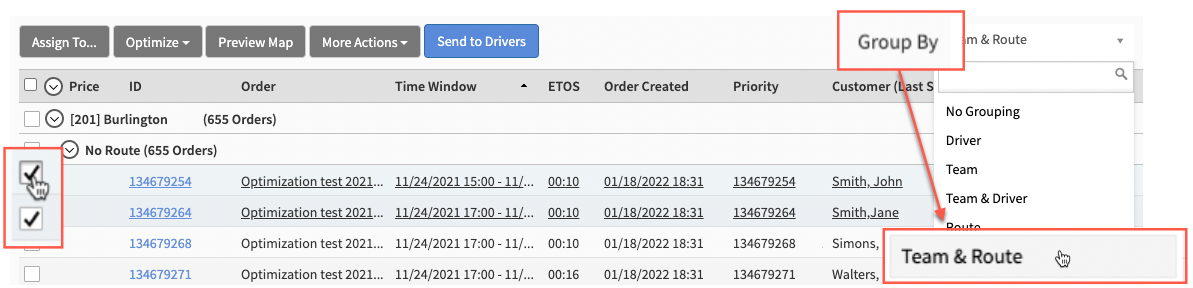 Select orders from a single team to reassign
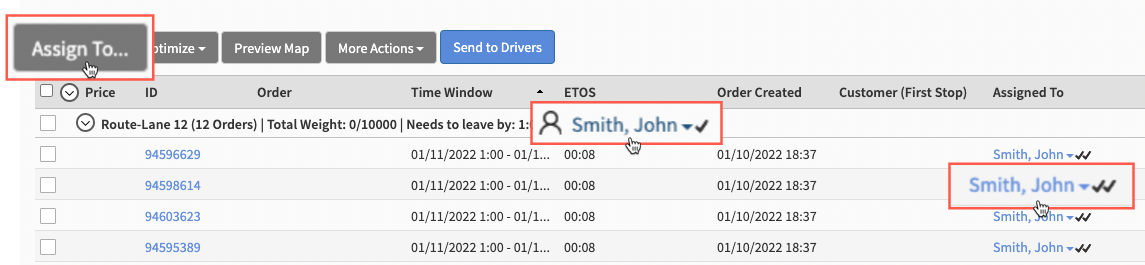
Step 3: To change the assigned driver:
- Select Assign To... in the top left corner.
- Select a driver name in the Assigned To column.
- If you grouped the list by routes, you can also select the driver name of the route group.
 Open the Change Assigned Driver window

This also works for orders that are Unassigned.
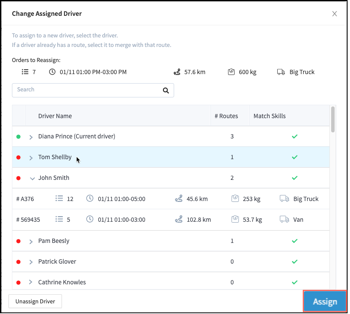
Step 4: To assign a different driver to the orders you selected:
- Use the search bar to find and select the target driver.Tip!
- A checkmark under Match Skills shows that the driver is qualified to deliver the orders. Learn more.
- A checkmark under Floating Inventory indicates the driver has the inventory items needed for the order in his possession. Learn more.
- Alternatively, you can add the orders to an existing route by selecting a driver to view their routes, then select the target route.
- Additionally, you can unassign the current driver from the order(s) to reassign at a later time by selecting Unassign Driver in the bottom left corner.
 Select the target driver or route
Use the summary row at the top of the window to verify you are reassigning the correct order, which you selected in the previous screen.
Field | Description |
|---|---|
| Displays the number of orders which you selected before this window opened. If you selected a route that includes many orders, you may choose to merge it with a route that has a relatively small number of orders. |
|
Choose a target route with a similar time window or a driver who will be on shift during that time. |
| If you selected an entire route, it displays the total distance covered by the route. If you selected a set of orders, this field is empty. If you want to merge this route with an existing route, check the sum of the distances and verify it is not too long. |
| If you selected an entire route, it displays the total weight of the goods in the orders. If you want to merge this route with an existing route, check the weight of both routes to confirm the vehicle can accommodate the total weight. |
| If you selected an entire route, it displays the name of the assigned vehicle. If you want to assign a driver without a route, check that this driver has the relevant license. If you want to merge a route to an existing route, choose one which has the appropriate vehicle for the goods of both routes. |
 Total orders
 Time window
 Total Distance
 Total weight
 Vehicle name
Step 5: Select the button on the bottom right to complete the action.
The text of this button changes according to the selection you made:
- Assign to assign an entire route to a driver.
- Merge to add a route or a set or orders to an existing route.
- Create New... to create a route by assigning a set or orders to a driver.
Step 6: You need to create a new route if you assigned set of orders to a driver.
If you are reassigning an entire route this is not necessary, as the route maintains its existing ID, start time and end time.
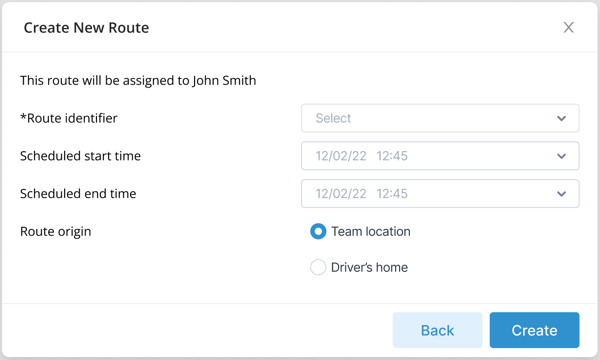 Add details to create a route from the orders you reassigned
Field | Description |
|---|---|
Route identifier | Enter the route identifier which typically indicates a vehicle or loading bay. Depending on your configuration, you can choose from a preset list, or enter it as free text. |
Scheduled start time | Select the start time for the new route, which is the time this driver should start delivering the first order. By default the time will reflect the earliest time the driver can arrive at the first destination (the order with the earliest Time Window). |
Scheduled end time | Select the end time for the new route, which is the time this driver should finish delivering the last order. By default the time will reflect the latest time the driver can arrive at the last destination (the order with the latest Time Window). |
Route origin | Enter the point of origin of this newly created route:
|
Step 7: Select Create.
Step 8: Adjust the sequence of the destinations after merging orders with an existing route or creating a new route.
You can do this automatically, by re-running route optimization (learn more) or manually by changing the orders' sequence in the Route Planner (learn more). The orders you add to a new or existing route may not be organized in the best sequence for delivery at first. Adjust the sequence to create an optimized route and receive accurate schedule start time and scheduled end time.
Was this article helpful?