Delivery blocks are the daily working hours (shifts) when your company delivers to its customers . You can assign delivery blocks to your drivers and/or vehicles, so that Bringg can consider their availability when creating routes with route optimization (RO) or AutoDispatch (AD). Drivers can also sign up for shifts (delivery blocks) directly on their Bringg Driver App.
You can set up regular repeating shift patterns to reflect your capacity to fulfill the demand for your goods and services. You can also define the number of drivers and vehicles required for each shift. For example, create recurring schedules with shifts 9am-12pm, 12-3pm, 3-6pm, and 6-9pm that require 6 drivers each, while weekends might have a different pattern and require fewer drivers.
Before You Begin
- Confirm you have a user of type or admin or dispatcher with the the permission Edit Delivery Blocks.
- Add your drivers (learn more) and vehicles to Bringg.
- Contact your Bringg customer service representative to enable delivery blocks.
Procedure
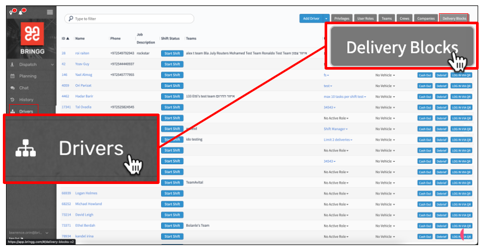
Step 1: Access delivery blocks from the navigation bar, by selecting Drivers > Delivery Blocks.
Blocks with white backgrounds are not booked to capacity, while blue backgrounds are fully booked. Each block displays the number of drivers assigned v. the max number of drivers needed for the block.
 Access delivery blocks
Step 2: Create a shift as a new delivery block by selecting Add block, and assign it an easily recognizable name, like Early mornings.
You can also add a description, to help users identify the purpose of a certain block. For example, you might describe a block as "early morning VIP deliveries."
.png) Create a set of delivery blocks
Create a set of delivery blocks
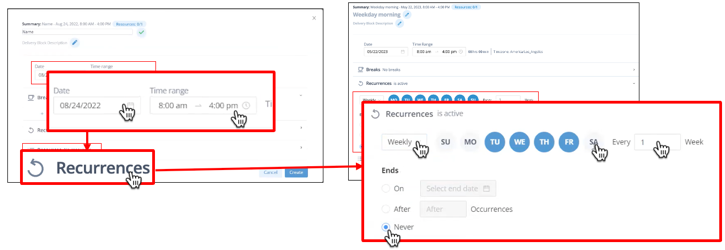
Step 3: Define the first occurrence of this delivery block, and whether it recurs at regular intervals.
For example, you can create delivery blocks that recur weekly Mon-Fri 6-9 am January 1.
 Define when the delivery block occurs
|
Field |
Description |
|---|---|
|
Date |
Select the date of the first occurrence of this type of block. Tip
(Multi-day optimization only) Select an end time that is earlier than the start time to create a delivery block that begins on one day and ends on the next. For example, for early morning deliveries where the driver needs to begin the route the night before. Contact your Bringg customer service representative to activate this feature. |
| Time Range | Select the start and end time of the delivery blocks. For example, create a 4-hour shift block from 8:00 am - 12:00 pm. |
| Reload Time | Specify a time when your drivers can return to the fulfillment center to reload between routes. For example, instruct them to return at 9:00am.
Reloading duration automatically combines the preset times for both loading and unloading. 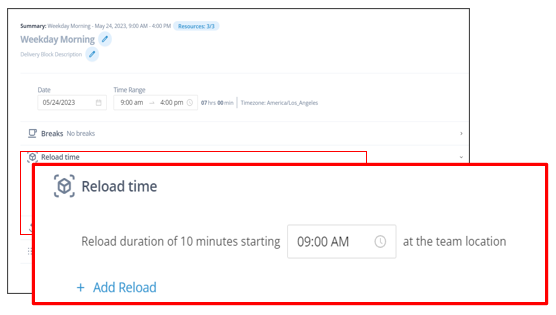
Note
This functionality is available only for resource-based optimization (type 6). Contact your Bringg customer service representative to join.
|
|
Recurrences |
Define the recurrence details by defining:
|
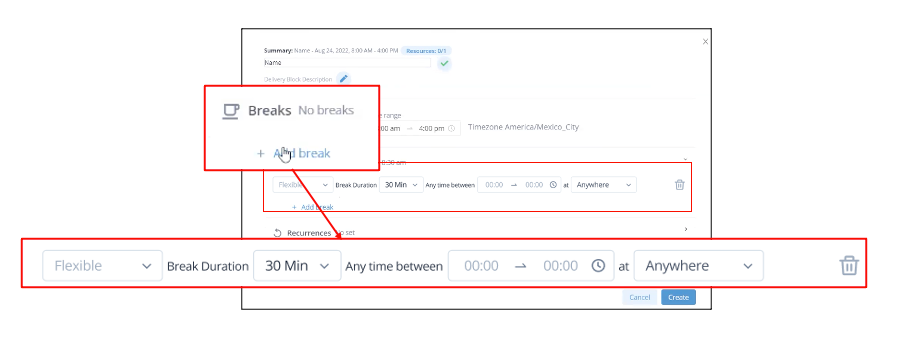
Step 4: Define the types of breaks and their duration within this set of delivery blocks by selecting +Add break and entering the break details.
Enter the type of break, break duration, time range for taking the break, and the allowed location for taking a break. For example, you may set a 1 hr break at the fulfillment center between 12-14 PM as your driver lunch break.
 Define the breaks within a shift / delivery block
|
Field |
Description |
|---|---|
|
Flex |
Select to define a break that drivers can take any time within the specified time range. |
|
Fix |
Select if you require mandated breaks at specific times. Typically, this helps ensure drivers return to the fulfillment center. |
Step 5: Define the resources available during this delivery block.
Bringg uses this information when creating planned routes with route optimization (RO). You must assign drivers to each delivery block before RO creates the routes. Learn more.
| To... | Do this... |
| Assign driver / vehicle / trailer sets.
For example, if driver have a fixed schedule and always work with the same assigned vehicle. |
a. Enter the number of required resources > Drivers > select specific drivers.
b. Either:
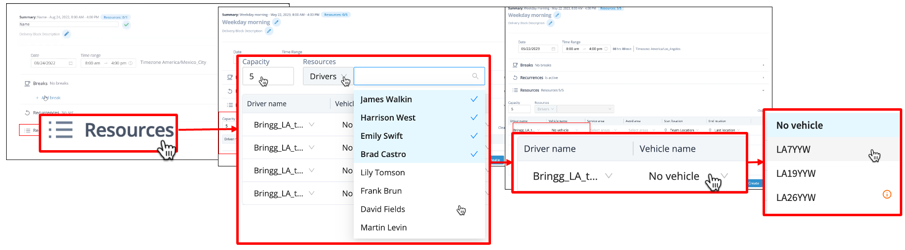 Assign driver / vehicle/trailer pairings. Assign driver / vehicle/trailer pairings.
|
| Create delivery blocks with the required number of drivers only.
For example, if dispatchers assign driver schedules at the end of each week. |
Enter a number of resources then select Drivers.
 Set the number of drivers needed for the delivery block. Set the number of drivers needed for the delivery block.
|
| Assign specific drivers only.
For example, if each driver uses their personal vehicle, or you do not manage vehicles in Bringg. Learn more. |
Enter the number of required drivers > Drivers > select specific drivers.
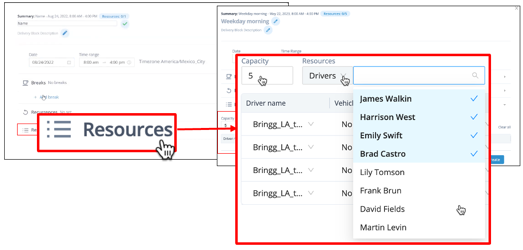 Assign drivers to the delivery block Assign drivers to the delivery block
|
| Assign specific vehicles only.
You can also include any trailers that attach to the vehicles you chose. For example, if your workflow includes Bringg creating your routes with vehicles and then you assign drivers manually at another time. Learn more. |
Enter the number of required vehicles > Vehicles > select specific vehicles.
(Optional) Then select a trailer for each vehicle from the dropdown in each row. Tip!
You can pre-assign vehicle-trailer pairs and then Bringg automatically displays the trailer once you select the vehicle.
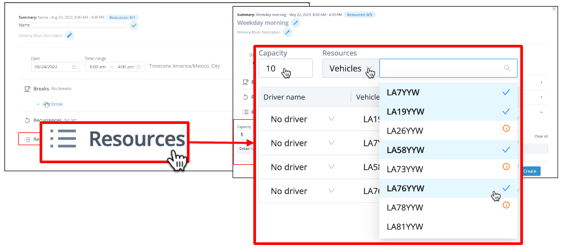 Assign vehicles (and trailers) to the delivery block Assign vehicles (and trailers) to the delivery block
|
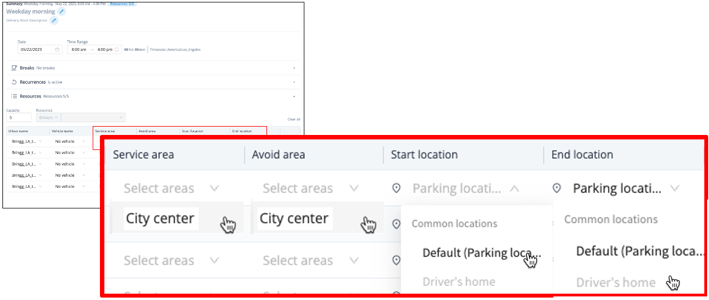
Step 7: Enter further details for each resource.
 Add resource details
| To... | Do this... |
| Designate a resource to fulfill orders in a certain area.
For example, assign motorcycles to a service area in the center of the city, where only small vehicles can enter. |
Select the Service areas in the resource's row. |
| Prevent a resource from fulfilling orders in a certain area.
For example, select the city center as an avoid area for large trucks that can not enter due to height restrictions. |
Select the service area under the Avoid areas column in the resource's row.
|
| Define the resource's starting location. Bringg uses this information when creating your routes.
For example, define whether a vehicle will be located in the fulfillment center or at one of the designated parking locations. |
Select the Start Location in the resource's row.
|
| Define where the resource needs to be at the end of the route. Bringg uses this information when creating your routes.
For example, a driver may need to end their route at a designated parking area closest to their house. |
Select the End Location in the resource's row.
|
Step 8: Select Create to save this delivery block to the work schedule.
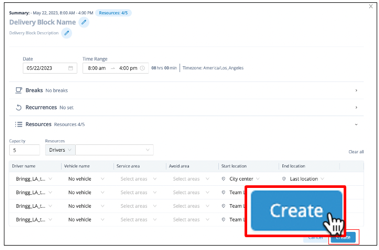 Save the delivery blocks
Step 9: Assign resources or adjust details for delivery blocks by:
a. Selecting the week or date you want to adjust.
e. Select Apply.
.png) Adjust delivery block details of assignments.
Adjust delivery block details of assignments.
Step 10: Remove a single or recurring delivery block from your schedule. Select the week or date you want to adjust, then select a delivery block > Delete > select whether this change should apply to a single delivery block, some, or all recurrences of the delivery block.
.png) Delete delivery blocks
Delete delivery blocks