You can configure Bringg's automatic notifications to customers to update them in real time as their order is fulfilled. You can determine the method your customers receive messages by customizing SMS and email notifications. You can also configure their timing by specifying the exact events inside Bringg which trigger a notification. These may include when a customer changed the delivery time, when the driver is on their way or delayed, or when fulfillment is complete.
For example, you can choose if customers receive notifications when the driver starts driving toward the destination, or within a set time ahead of arrival. You can also use notifications to collect feedback from customers to help you improve your quality of service.
 Communicate with your customer throughout the delivery flow
You may prefer to communicate exclusively via email since it has more formatting and branding options and it does not cost you extra, or via SMS if your customers check their phone messages more frequently. You may choose to set up a webhook if you prefer to communicate using your own CRM and/or social media platforms. Or you may prefer to use a combination of methods.
Choose the specific events in the order flow that trigger notifications like Order Started, and input the message content along with variables to automatically personalize the information. For example, use variables to add the customer's name and the delivery destination.
Before You Begin
Discuss with your marketing, and design teams to determine the look, content, and timing of your notifications. Ensure that they align with your company's overall branding and communication strategies.
- For SMS messages, make sure you are coordinated about the timing, content, and cost of sending messages. Also check if or when you want to send richer media as MMS messages.NoteSending notifications via SMS incurs additional costs which Bringg passes on to you.
- For email notifications, determine the HTML layout and content of the messages, the subject of each email, and the sender and reply to addresses.
- For webhooks, work with your IT integrator to choose the target systems (like a social media system), and the events which trigger each notification. Then define the specific content to appear in the the webhook sends to or from the customer. For example, you may want the payload for one webhook event to capture the customer's name, address, and phone number. And another webhook event might capture the order name.
- Customize your customer page to brand it with the appropriate look and feel you wish to use in communicating with your customers.
- Decide if you want different notification flows for different scenarios. For example, if you deliver both standard and specialty or white glove orders, you need separate order and notification flows for each order type. In such cases, go to Settings > Tags > Add Tag to create a separate flow for each. Check the Customer Configurations box to configure customer notifications for each. This overrides your general Customer Notifications settings for the particular tag.
Procedure
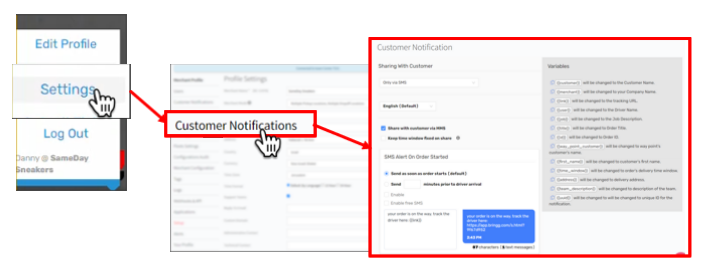
Step 1: Open the Customer Notifications Page by selecting Settings > Customer Notifications.
 Begin customizing your notifications
Step 2: Select the channels of communication to send notifications:
Field | Description |
|---|---|
All Methods | Select this option if you use different platforms for different types of notifications, or if you want to let your customers choose their preferred method of receiving notifications, via email, SMS, or other social media platforms. Selecting this option means you need to follow all of the steps defined in this table to configure notifications. Ignore only the Do not share with customer associated action item. |
Only via email | Contact your Bringg customer service representative to apply your custom HTML templates that utilize your company's branding. They can also help you insert the subject line, the sender name, the reply to address, and so on. You can use different HTML templates for each event or Tag. |
Only via SMS | Select this option if you plan to communicate with customers primarily or exclusively through SMS notifications. You might choose this option if real-time communication is more important than branded graphics. This option will incur additional charges. |
Do not share with customer | Select this option only if there is no direct contact with customers during the fulfillment process. For example, if you are a contracted delivery provider and the shippers maintain direct contact with their customers. In this case, no further notification configurations are necessary. Select this and save your settings by clicking the Update button at the bottom of the page. |
Only webhook | Choose this option if you prefer to communicate with customers using your own CRM or order management system, or if you wish to use social media platforms like Whatsapp or Viber for notifications. With your IT integrator, set-up a webhook for each event by going to Settings > Webhooks and API > Add webhook. Then save your settings by selecting the Update button at the bottom of the page. |
Also, if you configure any webhook events, they will trigger even if you have selected Only via email or Only via SMS.
Step 3: (SMS only) Select the desired notification language. When they appear in bold they already have notifications, so you can either edit those or choose a new language that appears grayed out.
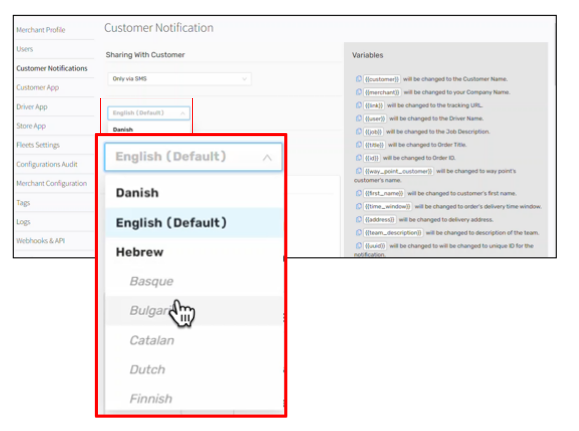 Choose a new language for SMS notifications
Step 4: (SMS only) To send images and other non-text content via SMS, select Share with customer via MMS.
For example, use this if sending photos to confirm delivery.
Step 5: (SMS only) If you want the time window to remain static throughout the fulfillment process, as originally defined by the customer, select Keep time window fixed on share.
For example, if the time window is already limited to one or two hours, it may create problems and delays if narrowed further. This affects any notification that references the {{time window}} field.
Step 6: (SMS only) Determine which events trigger a notification, and mark them Enable.
Event | Context for Notification |
|---|---|
Order Started | This is the most commonly triggered notification. It indicates the driver is on the way to the destination, and allows the customer to track the driver's location. You can decide to send the notification as soon as the driver is on their way, or xx minutes until they arrive. For example, if the travel time is particularly long, you may choose to send a notification 30 minutes ahead of arrival. However, doing so requires configuring a real time ETA. For more information, contact your Bringg customer service representative. |
Late SMS | If you already sent a notification that the driver is on their way (Order Started event), enable this notification if they are significantly delayed beyond the original ETA. This notification will only work if you also set the Order Started event to trigger within a specific number of minutes ahead of arrival at the destination. |
Order Created | This notification marks an order created in Bringg. It is triggered instantly when the order reaches Bringg to execute the fulfillment process. |
Schedule SMS | This notification reminds customers of the delivery slots they selected either upon placing the order, or in the Scheduling SMS notification. You can contact your Bringg customer service representative to customize when and under what conditions to activate it. For example, you can send a notification when an order moves to dispatch indicating that the order is about to make its way to its destination. Or you can create a trigger according to a custom schedule related to the time window, or at any other point in the process when you think a reminder is helpful. Use this notification for planned rather than on demand orders. |
Route Started | This notification indicates the driver is on the way to the first destination on the route containing your customer's order. Use this notification for planned rather than on demand orders. You can also use it when there are relatively few destinations in a route or when all or most of the orders in a route are in close proximity to one another, and/or have short anticipated time on site. In these cases, a Route Started notification gives a useful indication that the order will arrive shortly. |
Driver Arrival | This notification indicates the driver has arrived at the destination. You can define arrival based on a driver manually , or by Bringg recognizing the geofence location. This notification is particularly useful when a destination is inside a building complex or in heavily secured area requiring stages of access. You can configure this setting by checking the box in Settings > Driver App > Hands Free Driver Mode. |
Driver Leaving | This notification indicates that the order fulfillment is complete. You can use it to thank customers for their business and/or ask them to evaluate the quality of service. Activate this setting by checking the Show Rating Screen and Show post rating reason screen boxes in Settings > Customer App > Rating Screen. Also when enabled, the driver may send an MMS message at this stage with a photo of the delivery if the recipient was not at the destination at the time of fulfillment. |
Reschedule SMS | Use this notification only if a delivery failed or needs to be rescheduled for another reason like driver delays or vehicle capacity limitations. This notification usually includes a link for the customer to select a new time window when the time slot chosen in the Scheduling SMS notification cannot work. |
Scheduling SMS | This notification usually includes an invitation link for the customer to choose a delivery time slot. Use this notification only for planned orders that are not automatically scheduled. The time slot the customer chooses here will appear in the Schedule SMS reminder notification later. |
Customer Pickup | This relates to any order. If activated, the customer receives a notification when the order is ready for pick-up. |
When you select Enable, you can choose to also select Enable private mode. Use this if you do not want the customer to be able to see the exact location of the driver. For example, when delivering orders containing luxury items, there is a risk of theft if revealing exact location.
Step 7: (SMS only) For any enabled event, enter the content of the notification in the free text field. Copy and paste any relevant Variables from the list on the right side of the screen to personalize your notifications as you wish. For example, you can include the customer's name, the delivery address, custom links, and so on.
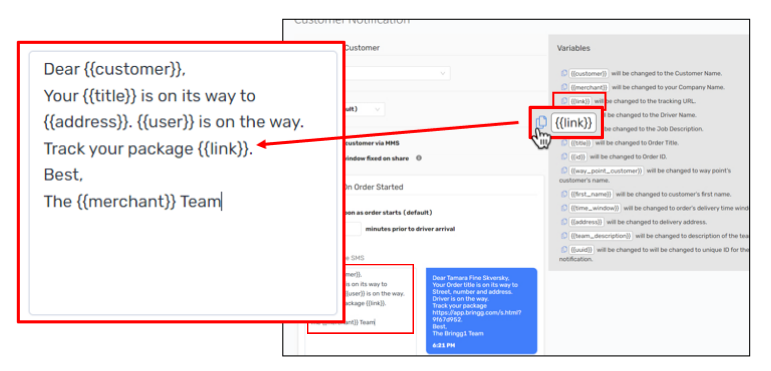 Choose the variables you need for each message
For example, an SMS might have this content:
Hi {{first_name}},
Your {{title}} is on its way to {{address}}. {{User}} is on the way.
Track your package at {{link}}.
Best,
The {{merchant}} Team
Field | Description |
|---|---|
{{customer}} | Inserts the customer's full name (first, middle and last name). |
{{merchant}} | Inserts the name of your company or instance in Bringg. |
{{link}} | Inserts the URL leading to the Bringg customer page which typically includes real time updates of the order status. |
{{user}} | Inserts the assigned driver's name. |
{{job}} | This is a free text field used for additional information related to the driver that appears in the Bringg customer page. It may insert the assigned driver's job description like biker or walker, or the name of the delivery provider fulfilling the order. |
{{title}} | Inserts the title of the order. For example, the name of the item purchased. |
{{id}} | Inserts your order ID. |
{{way_point_customer}} | Inserts the name of the contact associated with the order's destination. For example, if a customer is sending someone a gift, this could be the gift recipient's name. |
{{first_name}} | Inserts the customer's first name. Use this, for example, in the start of a notification. |
{{time_window}} | Inserts the order's delivery time window as selected by the customer or assigned automatically. Before using this variable, check if you opted to Keep time window fixed on share. |
{{address}} | Inserts the address of the destination. Depending on what details you collect, this may include only the house number and street name, or it may also include city, state, zip code, and so on. |
{{team_description}} | Inserts a text field describing the team in a way that makes sense for the customer to see. For example, internally your teams might have names like Team A, Team B, and so on. However, the {{team_description}} the customer sees is simply the name you choose to publicly display. |
{{uuid}} | Inserts Bringg's order ID. This is different from {{id}} which inserts your assigned order ID. |
| {{verification_pin_code}} | Inserts a 4 digit verification pin code that the customer then provides the driver to complete the order. |
As you draft your notifications, Bringg displays the number of characters in each message. Character limits for SMS notifications vary depending on the carrier. Be careful not to exceed your limit so as not to incur additional SMS charges.
Step 8: (SMS only - optional) Select Enable Free SMS only in a very specific case when you are a delivery provider without direct contact with customers.
As a carrier, you do not own the order checkout experience, you may need to collect opt-in from customers as part of the flow in Bringg. The customer does not pay to receive the message and can opt-in by following a two step process beginning with a link to the Bringg customer page contained in the SMS. Sending this free SMS requires you to have an independent arrangement with an SMS service provider. Contact your Bringg customer service representative for more information.
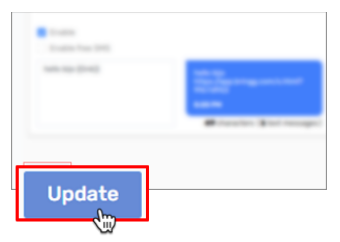
Step 9: Select Update to store your settings.
 Save your notification preferences, and activate any SMS notifications you enabled
.png)