Set Up Custom Attributes
- 01 Feb 2024
- 1 Minute to read
- Print
- DarkLight
Set Up Custom Attributes
- Updated on 01 Feb 2024
- 1 Minute to read
- Print
- DarkLight
Article Summary
Share feedback
Thanks for sharing your feedback!
Use custom attributes to include details unique to your organization in your order flow, creating seamless alignment throughout your fulfillment process and outstanding service for your customers. Define custom attributes to view them throughout Bringg, use them as options in other Bringg features, and collect data on how these details affect your fulfillment.
For example, include the customer’s member ID in the order details so store associate can easily locate their order according to it.
Before You Begin
- Confirm you have a user of type Admin.
Procedure
Step 1: Add the custom details under the extras field in your create order payload. Learn more.
Step 2: Add a new custom attribute by selecting your username > Settings > Merchant Configurations > Custom Attributes > + New Attribute.
.png) Add a new custom attribute
Add a new custom attribute
Tip!
Bringg scans your order payloads from the last 90 days to find unmapped fields that you use often. You can add these suggested fields, by selecting +Add in their row..png) Add a suggested custom attribute
Add a suggested custom attribute
.png) Add a suggested custom attribute
Add a suggested custom attribute
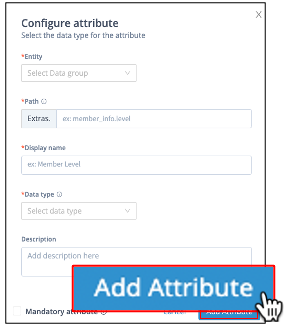
Step 3: Enter the attribute details.
.png) Enter the attribute details
Enter the attribute details
Field | Description |
| Entity | Select the data group the custom attribute is related to. Currently, all custom attributes must relate to the Order entity |
| Path | Enter the attributes data path after the Extras. For example, if the attribute sits under the member info object and is an instance of a membership ID, enter "member_info.membership_id" as the path. |
| Display name | Enter an easily recognizable name that should appear in Bringg features. For example, enter "Membership ID" as the display name. |
| Data type | Select the attribute's data type so Bringg knows what options to display for it. For example, a string data type may be added to multi-select lists. |
| Description | Enter a description that allows users to quickly understand what the attribute is used for. For example, you may describe which membership IDs require a different level of delivery service. |
| Mandatory attribute | Select to define a custom attribute as a mandatory field in the API payload. Once defined as mandatory, if the attribute is missing from the payload, the API call will return an error. |
Step 4: Select Add Attribute to save.
 Save the custom attribute
Step 5: Use the custom attribute as options in various Bringg features, such as:
- Details in the order pages.
- Columns and filters in the Dispatch and Planning views.
- Conditions in Automations. Learn more.
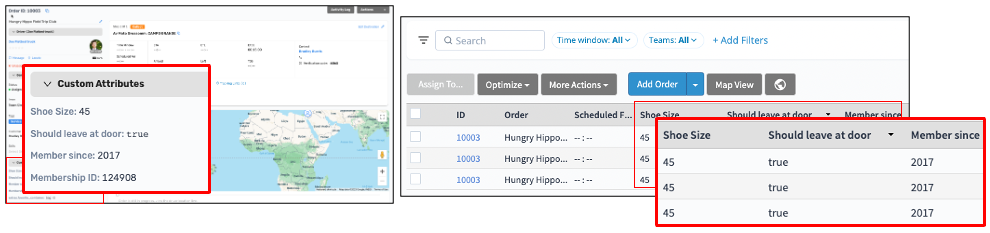 Use custom attributes throughout Bringg
Step 6: Select the ellipses icon to edit or delete an existing attribute.
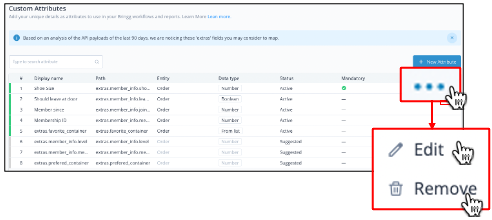 Edit or delete a custom attribute
Was this article helpful?