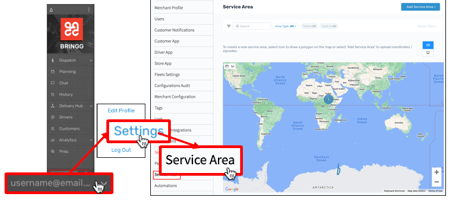
Access the service area page by selecting your username from the menu bar then selecting Settings > Service Area in the Bringg Platform.
For example, name a service area that covers a certain neighborhood with that neighborhood's name.
Define the geographic scope of a service area by entering polygon coordinates or zip codes and then selecting Apply.
You must define your service areas with polygon coordinates in order to include them in route optimization.
Tip! You can also create a service area by selecting the polygon icon and drawing a polygon on the map.
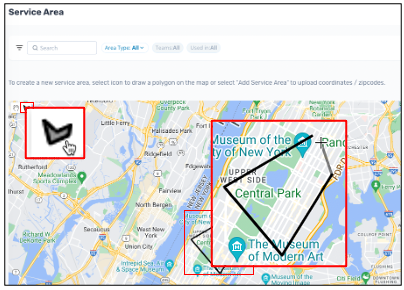 Draw a polygon on the map
 Assign Teams
To assign the teams that deliver to the service area, select the team name from the dropdown list.
.png) Select teams to service the area
Select teams to service the areaPrioritize team assignment
(Optional) Select the dots next to the team name to drag and drop them in your preferred order. This creates a prioritized list that designates which team should be assigned orders first, for example, if more than one team services the same area.
The first team on the list receives orders first. If they do not have capacity, the order is sent to the next team.
 Set the team priority
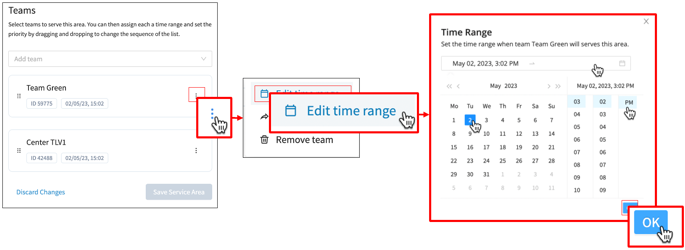
Schedule team assignment
Set the dates when each team services the area.
For example, team A may serve the area year-round, while team B joins during the holiday seasons.
Step 1: Select the ellipses icon > Edit effective dates.
Step 2: Select the dates and times when the selected team should service the area.
Step 3: Select OK.
Set team effective dates
Activate Your Service Area
Activate the area by selecting Save Service Area.
.png) Save to activate the service area
Save to activate the service area
Manage Service Areas
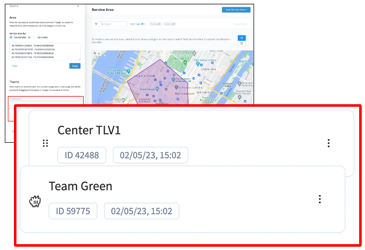
View all service areas
You can review your service areas by viewing them on the map or as a list by selecting the list or map view icons.
.png) Review your service areas
Review your service areas
Edit a service area
Edit service areas by either selecting them on the map or from the list and choosing Edit.
The Bringg Platform is the leading cloud provider for delivery and fulfillment, helping you scale and optimize your last mile delivery operations and omnichannel customer experiences. With a real-time view of the delivery process, you get the visibility you need to ensure goods and services reach consumers safely, affordably, and on time.
Bringg empowers a collaborative ecosystem, putting the power back in your hands to drive exceptional delivery experiences at minimum cost.
Bringg helps you make fast, accurate decisions by alerting you to potential problems before they become larger issues, and presenting the information needed for you to react. With Bringg, you can fulfill orders efficiently, with more peace of mind, and better consumer satisfaction.
Bringg helps you keep pace with consumers' growing demands by offering them flexible options like express shipping, Click & Collect, green delivery, and the ability to schedule delivery when they choose.
With Bringg 's Delivery Hub you can access a diverse global network of 300+ delivery providers to expand your business and meet changing market demands. Learn more.
Increase efficiency with optimized routes and AutoDispatch, and keep track of your overall performance with real time report data.
You can draw service areas on a map in Bringg, or use a list of zip codes, to define your distribution network. Orders that arrive in Bringg are sent to the team or carrier responsible for the service area of the order's destinations.
You can assign drivers to a specific service area within your delivery scope. This way, drivers can be familiar with their specific area, or remain nearby a specific area.
You can also use service areas to separate regions on the map to align with your business practices. For example, you might have a different delivery speed, price, or availability in some areas based on their distance from your fulfillment center. You can do this in Bringg by defining rules for each service area.
A fulfillment center can have multiple service areas, but a single service area can also belong to several fulfillment centers. For example, you might want to share a service area when your inventory is split among several warehouses, or when you need to recruit drivers from another location to assist with high demand.
A team groups together the people and vehicles needed to fulfill orders from a specific fulfillment center or service area. It can contain drivers, dispatchers, vehicles, and orders.
For example, you can define a team as all orders and drivers assigned to a few stores in a small neighborhood. Or a team might consist of refrigeration trucks, their drivers, and orders of perishable goods. If you use carriers, you can define delivery terms to assign a team's orders to specific carrier and then use the fleet router to automatically choose the best one for each order.
To fulfill an order, you must assign it to a team, then Bringg can assign it to a route and driver or to a carrier.
Dispatchers only see drivers and orders assigned to their teams. If a driver belongs to multiple teams, the dispatcher or driver can choose which team to join at the start of each shift.
A delivery provider (DP) offers their fleet of vehicles to fulfill orders on behalf of the shipper. carriers promise different levels of service, cover specific territories, and may specialize in different types of goods and services, such as parcel retail, restaurant, and grocery delivery. You can add more carriers to expand your service coverage by finding the best fit for your business in our carrier catalog.
There are two types of carriers:
- Carriers are often the more established carriers with their own branded fleet of vehicles and drivers, which they offer to shippers to fulfill their orders. Carriers can typically deliver higher volumes and a wider variety of goods around the world, and can therefore batch planned orders together, sometimes several days in advance, to offer shippers cheaper rates.
- A crowd-sourced last mile carrier uses independently contracted drivers to populate its fleet. Since the drivers usually use their own vehicles, this type of carrier often fulfills hyper local orders that require more immediate fulfillment (on demand, same day, or next day orders). Their wide pool of local drivers enables them to offer cheaper rates for these deliveries.
An order is a request for the fulfillment of goods and services at a specific address. It includes all information needed to complete it, such as the requested service or goods, the customer’s contact information, required services (such as fragile care), and the time window.
A fulfillment center is your home base and where you prepare orders for dispatch. It might be a store, warehouse, factory, garage, or restaurant.
You can configure Bringg to automatically perform actions when drivers approach your fulfillment center. For example, you can make a driver available for AutoDispatch, or take them on and off shift, without requiring them to manually check in. These actions are called home events.
Each team has at least one fulfillment center, and each fulfillment center can have one or more service areas.
Run Bringg's route optimization (RO) to reduce costs by organizing your orders into the fastest, most efficient planned routes, where each order arrives at its destination within its designated time window. If you have an Own Fleet, RO can also assign each route to a vehicle or driver who is available at that time and has the correct skills to fulfill the orders. You can configure RO with preferences like the maximum length of a route, the time on site (TOS), the time to load the vehicle, predicted and real time traffic patterns, and so on.
For example, you can ask to set route optimization (RO) to limit the number of destinations on a route, or to use the minimum number of vehicles in a route.
Each time you run route optimization on the same group of orders you may well receive a different result, as there are multiple ways to organize the same group of orders into efficient routes. Instead of reshuffling all orders each time, build on your existing plans by making focused changes where they are required using the route planner.
You can run RO manually or automatically at set days and times, for select teams or across the entire organization.
On demand orders typically use AutoDispatch (AD) instead.
 Access service area page Add a Service Area
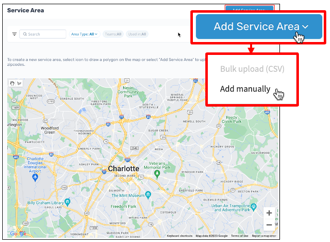 Add a service area
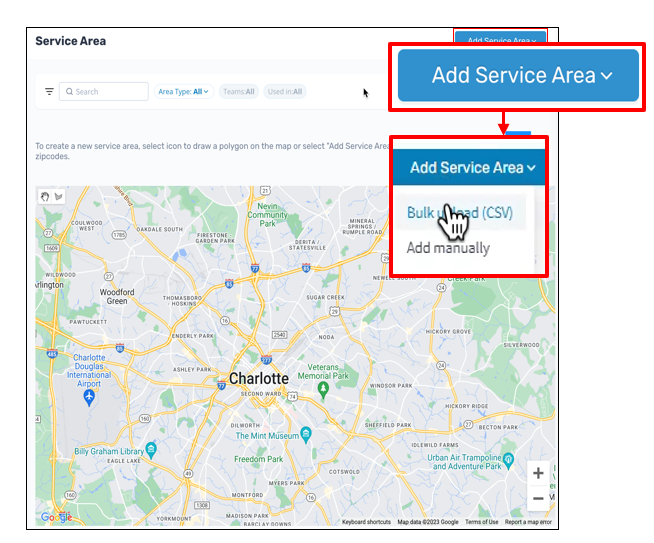 Create service areas with a CSV upload
 Create service areas with a CSV upload
 Enter a polygon or zip codes
 Draw a polygon on the map
 .png) Select teams to service the area
Select teams to service the area Set the team priority
.png) Save to activate the service area
Save to activate the service area.png) Review your service areas
Review your service areas