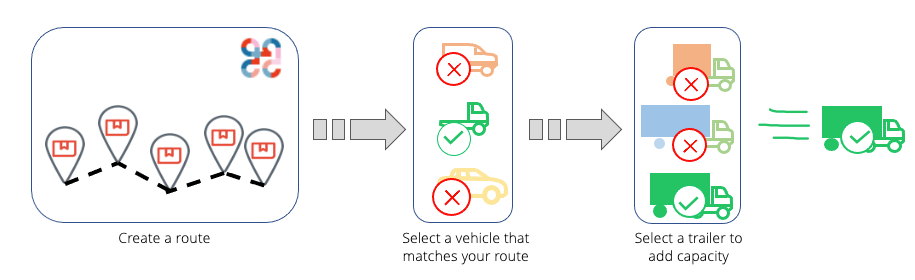
You can assign a vehicle to a route easily and quickly by choosing from the list of available and appropriate vehicles, and you can add capacity if needed by selecting the most efficient trailer. Bringg automatically compares a route's requirements with the capacity and capabilities (skills) of each available vehicle and trailer.
For example, after creating a route, you can choose the best option from your Own Fleet to make sure that you are not using a small trailer when the load requires a large one, or a large van when a small car would be sufficient for the load. This also applies to checking if a route requires a refrigerated truck, or other special capabilities (skills). Alternatively, you might need to reassign a new vehicle so that you can perform maintenance on the one that was already assigned.
 Choose the most efficient vehicle and trailer for this route
Before You Begin
- Confirm your implementation of Bringg is configured to maintain vehicles and trailers.
- Update vehicles and trailers with capacities and skills to match orders.
- Create a route for your orders. This can be done by running route optimization, by creating an on demand route, or by manually creating a route. Learn more.
Procedure
Step 1: Open Bringg and navigate to History, Planning, or Dispatch > List.
Step 2: To view the details of each route, select Group By > Route. If you are working with multiple teams, you can choose Team & Route instead.
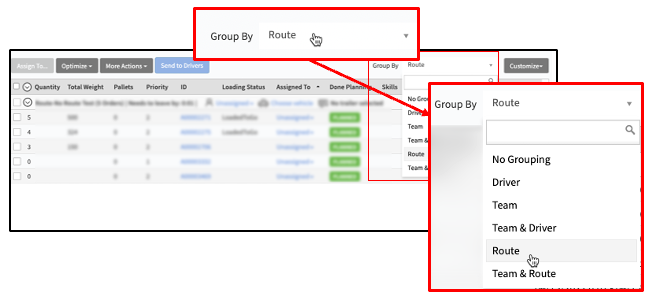 Sort orders by route to view vehicles
Step 3: (Optional) To isolate specific routes, you can filter the list.
For example, if you want to view only the routes that require a rushed delivery so that you can assign a motorbike to the route, select More Fields > Service Plans, and then choose the appropriate service level agreement from the list.
To locate a specific route that you have already assigned to adriver (optional), you can search the driver's name.
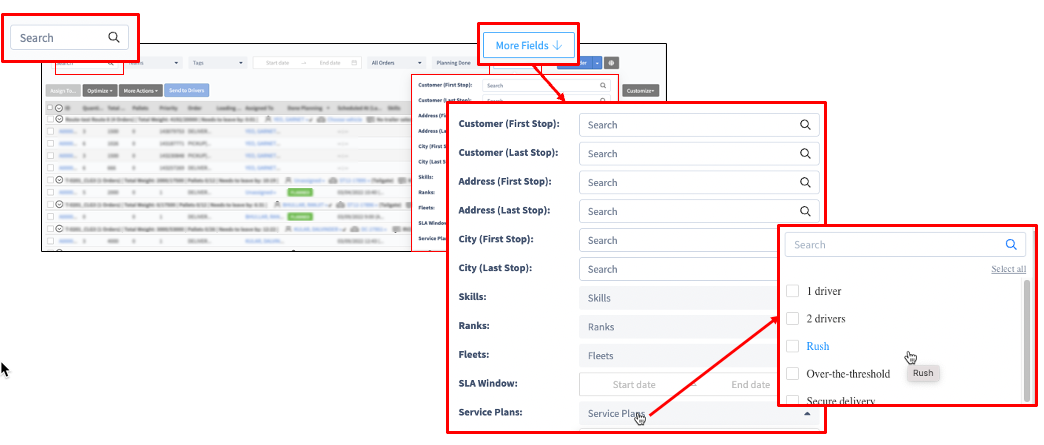
Find specific routes in Planning or Dispatch.
Step 4: To assign a vehicle to a route, select Choose vehicle next to the vehicle icon on the route header.
You can also assign a new vehicle to a route if it already has a vehicle, by selecting the vehicle name.
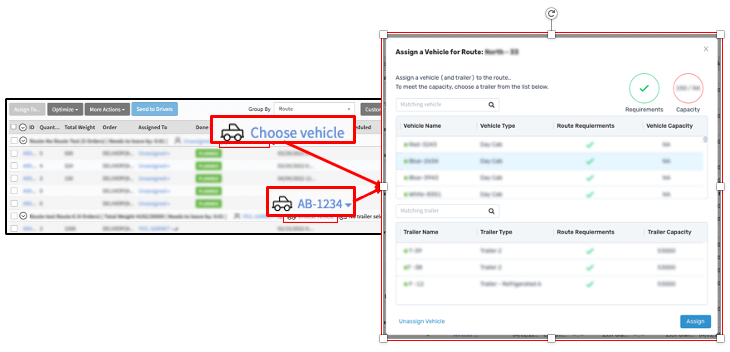 Assign a vehicle by selecting Choose Vehicle in the route's header
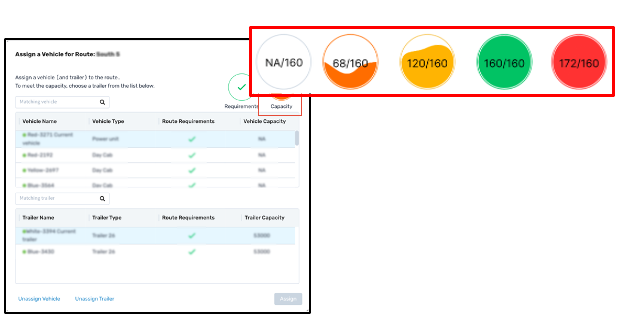
Step 5: The capacity bubble in the top right compares the volume of all orders in your route with the size of each vehicle.
When you select a vehicle in the list, the capacity bubble adjusts to show whether your choice is an efficient use of the vehicle's resources.
 Choose the most efficient vehicle and trailer
Some vehicles, like day cabs, have no innate capacity, and would display NA.
Field | Description |
|---|---|
NA White | This vehicle cannot carry any goods by itself. You can add capacity by combining the selected vehicle with a trailer. For example, a day cab or power unit that has no storage space. |
Orange | This vehicle's capacity is too large for this route, and would likely be a waste of resources. To work more efficiently, we recommend choosing a smaller vehicle. |
Yellow | This vehicle's capacity is almost filled by this route. There may be a more efficient option, but this one may be suitable. |
Green | This vehicle's capacity is almost filled by this route. There may be a more efficient option, but this one may be suitable. |
Red | This vehicle does not have enough capacity for this route. We recommend choosing a different vehicle or supplementing the capacity with a trailer. |


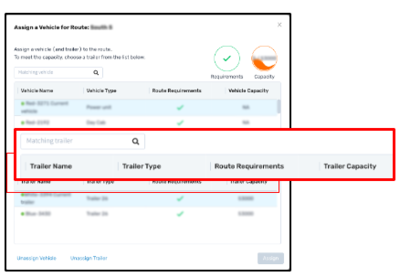
Step 6: If you need to add more capacity, select a trailer by following the same steps, using the available trailers.
For example, if you select a day cab with no innate capacity, the meter might read 15,000/NA. Then, when you choose a trailer which can hold 17,000, the capacity meter immediately updates to show 15,000/17,000 and would be almost filled with yellow.
Trailers which are available for assignment display with a green dot. Bringg automatically confirms if a specific trailer can work with the selected vehicle. It won't let you assign an incompatible trailer.
 Assign a trailer to the route
Step 7: To add the vehicle to your route, select Assign.
If needed, you can also: unassign a trailer, or both the vehicle and its trailer by
- Unassign a trailer selecting Unassign Trailer at the bottom of the window. For example, if you leave a trailer filled with goods at the customer's site, and collect an empty trailer for the return journey, you can track this in Bringg by unassigning the trailer on the outbound trip, and assigning a different trailer on the return drive.
- Unassign both a vehicle and its trailer by selecting Unassign Vehicle.