Troubleshoot system settings independently by viewing a log of Bringg configuration changes with the Configurations Audit. You see when and where a change occurred as well as who made the change.
You can investigate unexpected changes to Driver App settings, or Merchant Configurations in Bringg. If you suspect a particular user adjusted configurations that might have caused a glitch, you can opt to view only changes made by that user. You can also search particular areas of Bringg if you think an issue occurred within a specific configuration setting.
The Configurations Audit shows a comprehensive list of changes in the system settings in the tabs Customer App, Store App, Driver App, Merchant Configurations, Tags and so on. It does not display the flow of mouse clicks that created the change. However, it helps you trace what happened by showing you where and when the change occurred in Bringg.
Before You Begin
- Ensure you have a Bringg user of type Admin.
- Identify an unexpected functionality that you would like to troubleshoot and correct. Then decide on the best way to find the change in the system using at least one of the following criteria:
- Identify a date range or time frame when the issue first surfaced.
- Identify the user(s) who might have made the change.
- Consider where (which screens) in Bringg the change occurred.
Depending on your conclusions, you can filter to narrow the list of configuration changes you see in your Configurations Audit.
Procedure
Step 1: Select Settings > Configurations Audit.
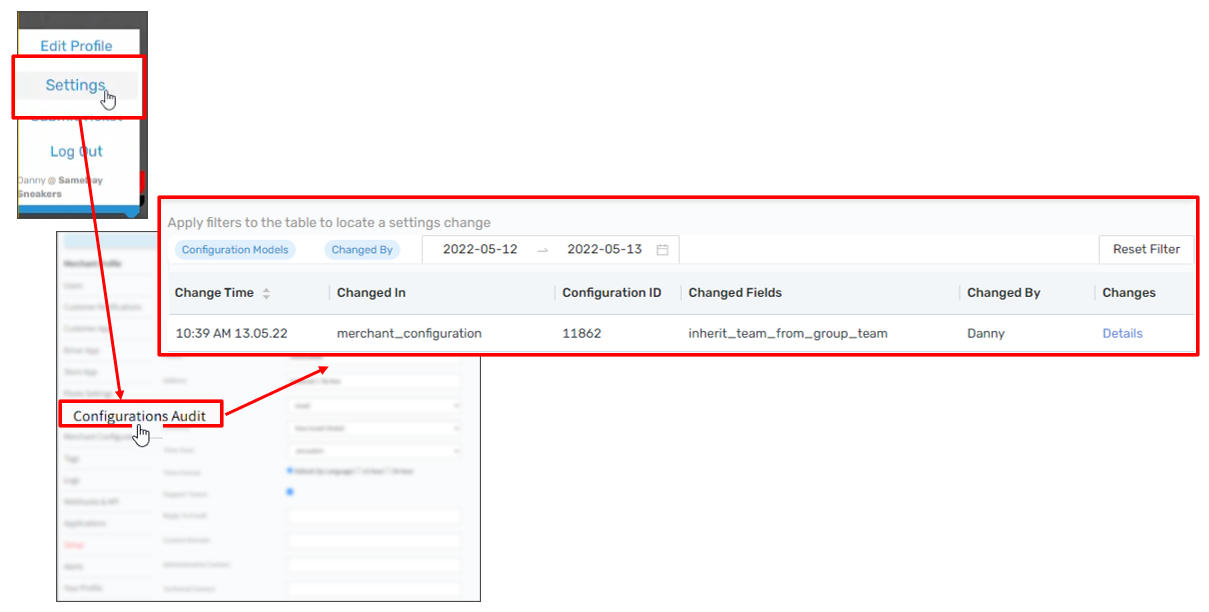 Open the Configuration Changes Log
The Configuration Changes Log automatically loads all changes within the default date range of the last seven days.
Field | Description |
|---|---|
Change Time | Displays timestamp when the change occurred. |
Changed In | Displays the database table location of the change in Bringg. |
Configuration ID | Displays the database row ID of the change in Bringg. |
Changed Fields | Displays the name of the column within the database table Bringg. |
Changed By | Displays the user's name who made the change or it displays Bringg if someone at Bringg made the change. |
If, after a moment, the table remains empty, perhaps no changes were made during the default date range. In this case, change the selected dates (see Step 2).
Step 2: Verify or adjust the date range.
For example, if you suspect an unwanted change occurred in the last two months, you can adjust the calendar filter accordingly to review any changes made during that time period.
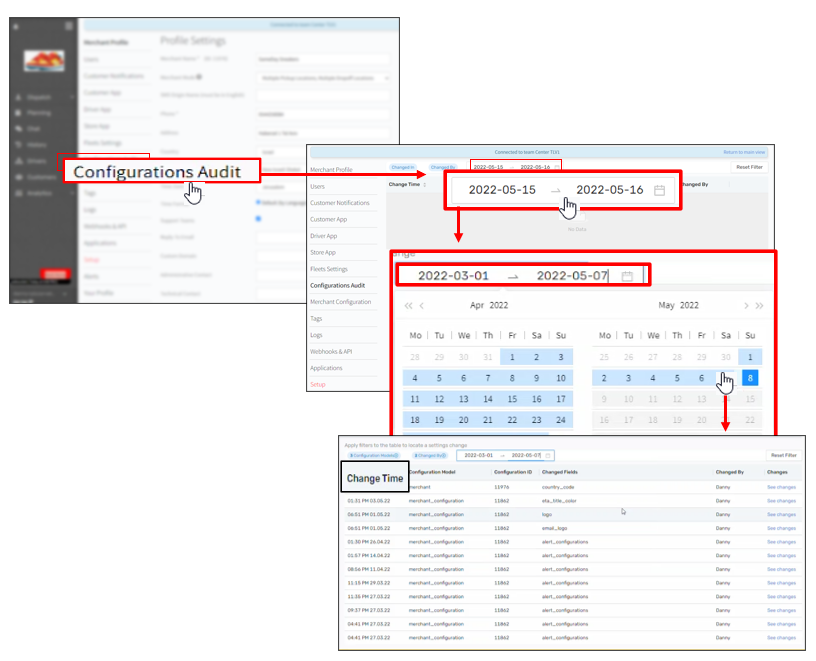 Adjust date range as needed using the calendar filter.
Step 3: Optional: Further isolate the change by filtering your view according to user and/or database table location.
For example, you may be looking or a change made in merchant_configuration, or you suspect a specific colleague made a change you want to reverse.
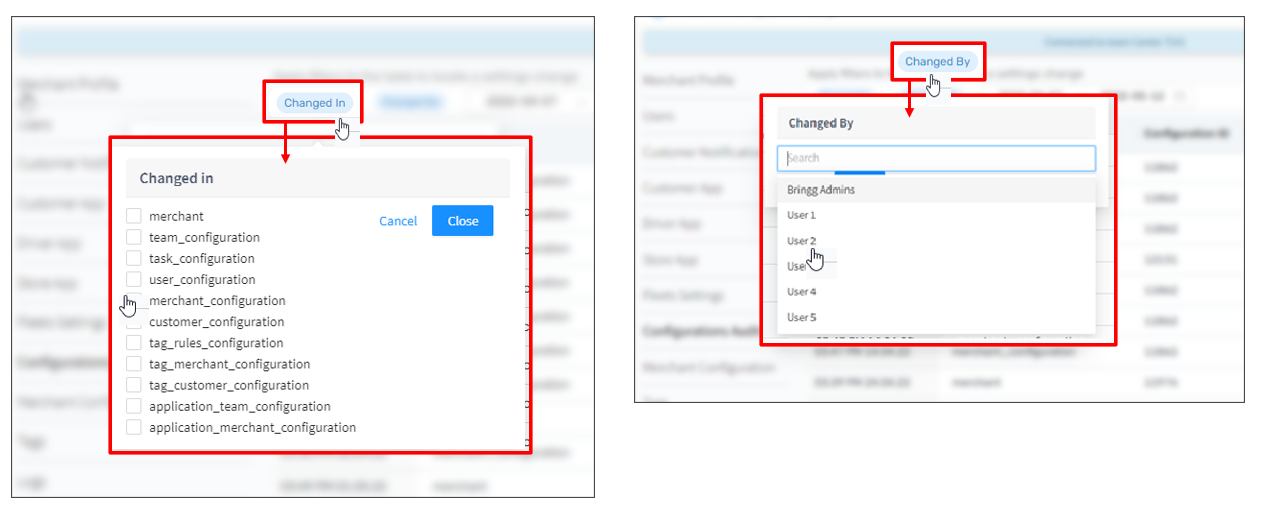 Filter the Configuration Tables Log by selecting relevant database table locations and/or users.
Step 4: Evaluate whether you can correct the configuration change independently, or whether you need to contact your Bringg customer service representative.
 Check Changed In location.
To understand if you can access the Changed in location independently, use the reference table below.
To access the Changed In database table... | Do this... |
|---|---|
merchant | Go to Merchant Profile or Merchant Configuration |
team_configuration | Contact your Bringg customer service representative |
task_configuration | Contact your Bringg customer service representative |
user_configuration | Contact your Bringg customer service representative |
merchant_configuration | Go to Merchant Configuration |
customer_configuration | Contact your Bringg customer service representative |
tag_rules_configuration | Go to Tags |
tag_merchant_configuration | Go to Tags |
tag_customer_configuration | Go to Tags |
| fleet_router_rule_team | Go to Carrier Selector |
| workflow | Contact your Bringg customer service representative |
| fleet_router_rule | Go to Carrier Selector |
| fleet_router_fleets_group | Go to Carrier Selector |
| rate_card_terms | Go to My Carriers > Rate Cards or Delivery Terms |
| rules | Contact your Bringg customer service representative |
| security_configuration | Contact your Bringg customer service representative |
application_team_configuration | Contact your Bringg customer service representative |
application_merchant_configuration | Contact your Bringg customer service representative |
application_merchant_configuration | Contact your Bringg customer service representative |
Step 5: To see exactly what changed,select an item from the Configuration Changes Log and view Details.
Changes will appear either as a value or in JSON format.
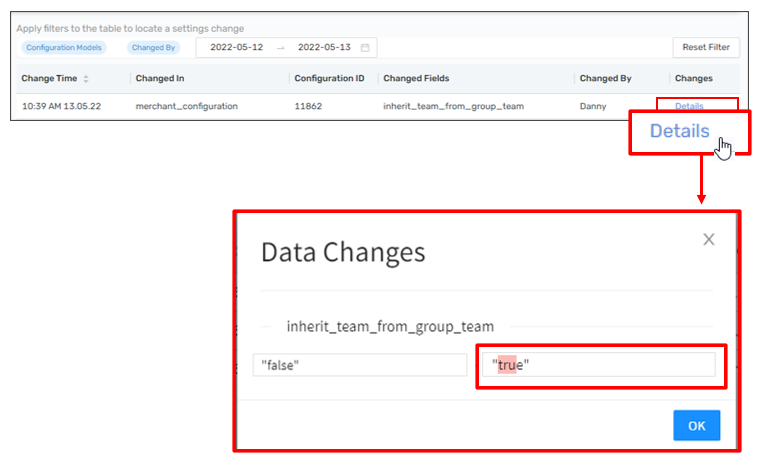 View the exact change in the database
Step 6: To correct the change, take one of the following actions (depending on location of change):
- If you can access the Changed In location independently, change the relevant field to what you need it to be.
- If you see your colleague made a change and you are not sure how to change it back, copy and paste the relevant Data Changes and email your colleague requesting they correct it.
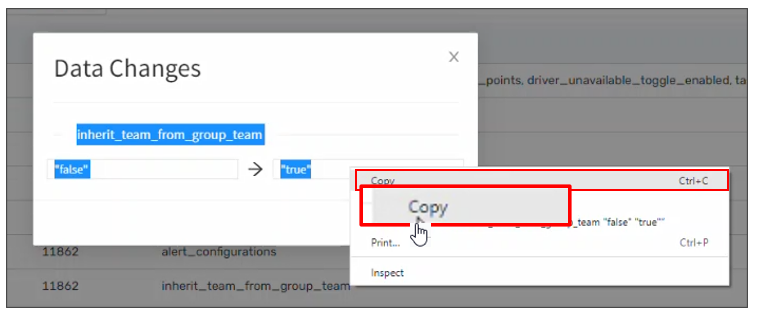 Copy the Data Changes content to share with colleagues
 - If you or your colleagues can't access the Changed In location, copy and paste the relevant Data Changes and contact your Bringg customer service representative