You can use Bringg's route monitor to supervise while drivers are en-route, to prevent or resolve delivery issues.
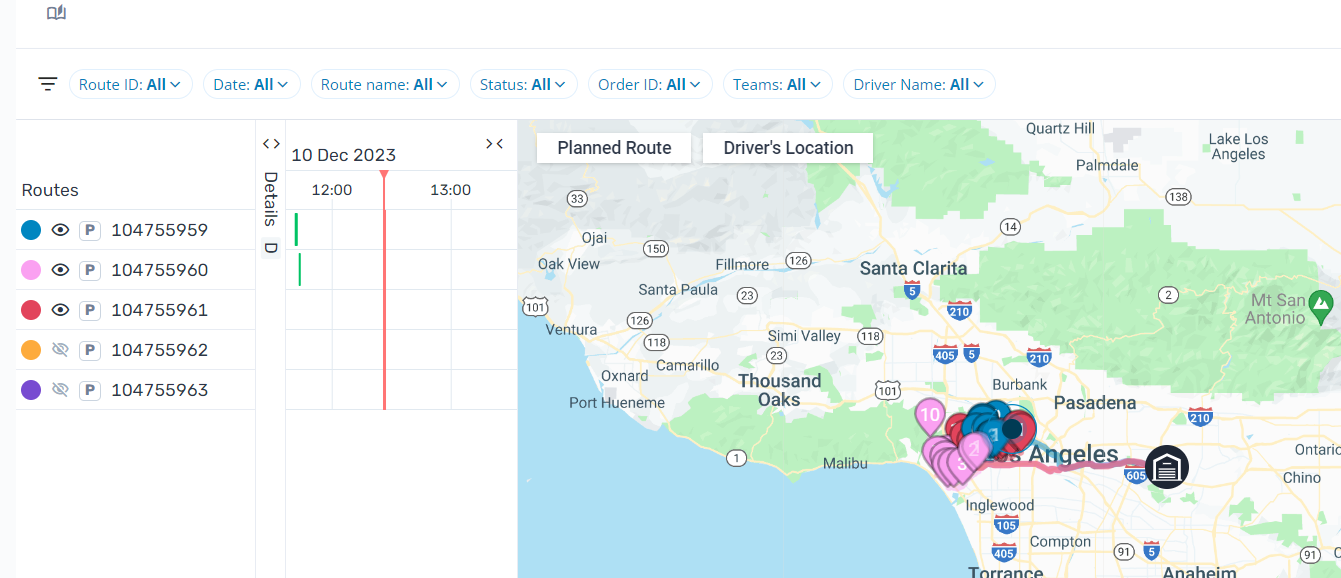
Bringg displays planned routes on a timeline, on a map, and as a list with each route's details, ensuring that you have all the information you need for route monitoring.
For example, identify when a route is running late at a glance by the yellow orders in the timeline, use the map to find where the driver is located, then reassign some of their orders to another driver nearby.
 Monitor routes in Bringg
Legend
![]() Arriving on time
Arriving on time
![]() Arriving late (after the planned time window ends)
Arriving late (after the planned time window ends)
![]() Arriving early (before the planned time window starts)
Arriving early (before the planned time window starts)
![]()
Arrived early
Arrived on time![]()
![]() Arrived late
Arrived late
![]() Canceled order
Canceled order
Before You Begin
- Confirm you have a user of type dispatcher (or admin).
- Confirm you use planned routes.
- Create routes for planned orders. Learn more.
- Contact your admin to request that a Bringg representative set up the route monitor in your merchant.
Procedure
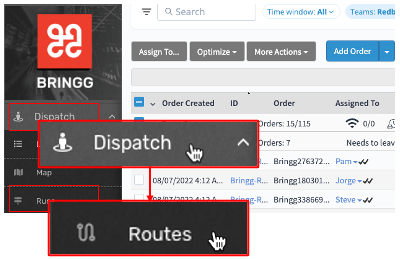
Step 1: Access the route monitor by selecting Dispatch > Routes or Planning/Dispatch > Route Monitor.
 Access the Routes viewStep 2: Choose the routes you want to display on the timeline by selecting Filters and adding the applicable filters.
By default, Bringg displays all the routes for all the teams you are responsible on the current date, add filters to view specific routes only.
For example, view all routes for a single team by selecting that team in the Teams filter.
You can revert the filters back to the default anytime by selecting Reset Filters.
.png) Filter to display routes on the timeline
Filter to display routes on the timeline
We recommend opening other Bringg pages in different tabs, as moving away from the Routes page changes the filters to their default settings.
Step 3: Display routes on the map by activating the ![]() eye icon next to the route name.
eye icon next to the route name.
You can add different layers of information to the map by selecting them.
For example, view the next destination the driver is headed to by adding an icon indicating the driver's position.
.png) Display routes on the map
Display routes on the map
| Field | Description |
| Planned Route | Use to display a line between each destination pin that represents the route path Bringg suggests the driver to follow. |
| Driver's Location | Use to display the driver's current location. Note Driver location displays only if driver is on shift. |
| Team Location | Use to display a |
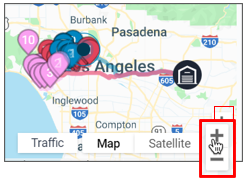
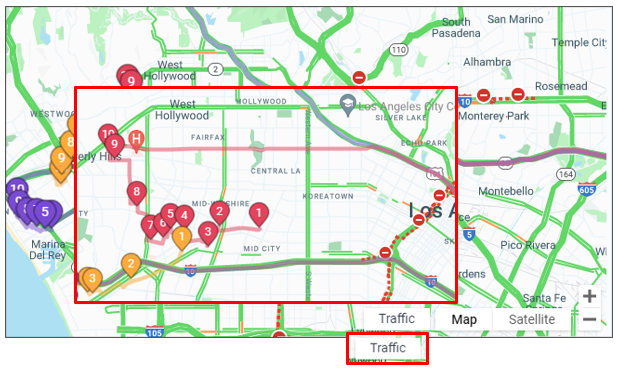
You can also adjust the map view to see traffic patterns or satellite view by selecting the applicable option.
Step 4: Review routes in advance to confirm your plans before handing them off to drivers.
For example, view the routes on the timeline to confirm each has a balanced amount of orders and on the map to confirm the routes do not overlap.
a. Filter by a date or time in the future.
b. Review the routes. The P icon in the list of routes indicates that the route is still in planning and has not been handed off to a driver.
c. Adjust any routes with the route planner, by selecting the routes in the list, then selecting Route Planner. Learn more.
.png) Confirm route plans before handoff to drivers
Confirm route plans before handoff to drivers
Step 5: Supervise while drivers are en-route to prevent or resolve delivery issues.
For example, easily see if a route is running very late and call customers to reschedule their delivery.
Bringg displays new data every 30 seconds. Select the Refresh button to update immediately.
To... | Do this... |
|---|---|
Assess the current state at a glance. |
View the area indicated by the red line on the timeline. 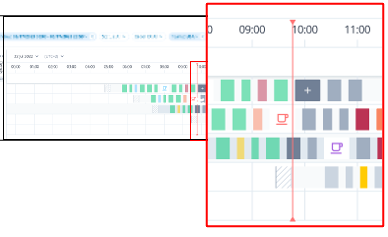 Follow the current time indicator Follow the current time indicator
|
Assess a route's progress. | Each order is represented on the timeline as a square colored according to the order's status. Use the colors to understand each order's status. Completed orders appear with solid coloring, future orders appear empty with the applicable color outline indicating Bringg's prediction of the delivery timing, and orders in progress appear with reduced opacity. Note! Routes without timing information appear with a warning icon in the route list. |
Prevent and resolve delivery issues. | Immediately notice any potential or active issues by monitoring alerts. Learn more. |
Step 6: React to changes on the ground.
To... | Do this... |
|---|---|
View route details. For example, find the vehicle used for the route to send a replacement vehicle of the same type. |
|
| Adjust the visibility and sequence of route details. For example, view vehicle assignments next to the driver assignments, or view the time window and weight capacity for a route before checking the vehicle assignment. |
.png) |
| View or assign a driver to a route. |
Note If you select an available driver or vehicle from the list, but the requirements do not match those of the orders in the route, an error message appears. 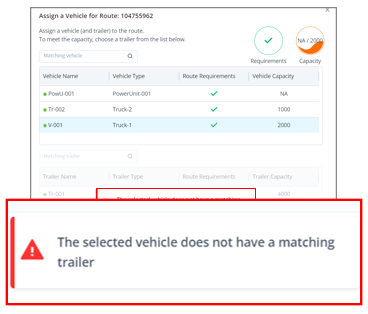 |
| Reassign or unassign the resources of a route. |
|
| Move a route to Planning or Dispatch. |
|
View order details. For example, to find the customer's contact information in case the driver arrived and there is no one present to accept the order. | Select an order on the timeline or map to view a summary of the order details. 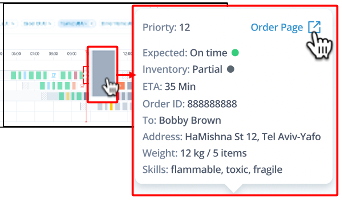 View order details View order details
|
Adjust a route. For example, to change the sequence of orders in a route to better fit the driver's preferences of starting point. | (Coming soon ) Select the routes in the list of routes then select Route Planner. Learn more.  Open routes in the route planner Open routes in the route planner
|
.png)