Plan, dispatch, and monitor routes with maximum visibility to make better, more informed decisions that utilize your resources effectively, increasing on-time and in-full rates and reducing WISMO calls. Prepare and optimize delivery routes and resource allocation by considering factors such as delivery windows, resource skills, and order locations. Adjust routes to maximize efficiency and successfully manage exceptions.
- View stop locations on the interactive map to manage new orders within existing routes on the unified map.
- View route KPIs like number of orders, route duration, and so on, and adjust routes in the route planner. Learn more.
- See route aggregated views and a timeline of planned and actual fulfillment status per date in the route monitor.
- Use the order manager to group, filter, and organize your data.
- Complete actions on selected orders. For example, assign unassigned orders to drivers, adjust routes in the route planner, or optimize them to form an efficient route.
%20(1).png)
Before You Begin
- Learn more about the new Dispatch and Planning experience.
- Verify your organization uses Bringg's resource-based optimization (type 6).
- Verify your organization's account has Planning enabled.
- Ensure you have a Bringg user of type Admin, or a Dispatcher with the applicable Planning and/or Dispatch permissionsincluding:
- Dispatch Menu
- Access All Open Orders
- Allow using Route Planner in Planning
- Allow to send a task from Planning to Dispatch
- Allow to Cancel Orders
- Verify you use planned routes.
- Set up delivery blocks for your team(s), and assign resources to each. Learn more
- Ensure as many orders as possible get assigned to teams. Learn more.
Access Routes to Plan
- To access orders and routes that span a range of dates, navigate to Planning > Order Manager
- To access planned routes on a specific date in order to update or change them, navigate to Planning > Route Monitor. For example, add a last-minute order within the same geographic area as an existing route. Learn more.
Identify Orders
Step 1: Select the teams whose orders and routes you wish to display.
Step 2: Choose which date(s) to view.
For example, to update planned routes scheduled for tomorrow, select tomorrow's date in the Route Monitor. But to plan the week ahead, select that time range in Order Manager
Step 3: Customize your view to focus on the orders you wish to see. For further details on how to find specific orders, learn more.
| To... | Do this... |
|---|---|
| Alternate focus between columns, timelines, and maps. | Collapse and expand the different sections using the reverse chevrons You can also adjust the width of columns as needed. |
| View orders assigned to a specific team, route, or driver. | Select a grouping option. For example, group by Team and Driver, Route, or Team and Route. Tip If you work with multiple teams, make sure your grouping includes by Team. |
Adjust the visibility and sequence of route details. For example, view vehicle assignments next to the driver assignments, or view the time window and weight capacity for a route before checking the vehicle assignment. | Select Customize, and choose which details you want to view in your display. Shuffle the sequence of the columns by selecting the grip dots icon and dragging the column name to reorder it.
|
| Focus on the routes you want to display on the list, timeline, or map view. | Select Filters and add the applicable filters. For example, view all routes assigned to single driver, along with those not yet assigned to anyone by selecting that driver's name in the Drivers filter You can revert the filters back to the default anytime by selecting Reset Filters. |
Save filters and column settings so that you and members of your team see only the most relevant data for the job you're doing at the moment. | Set up preset views. Learn more. For example, set a “Morning Shift” view that displays only the orders whose time windows are between 7am-12pm or an “Urgent” view that displays only VIP orders that are also late. Note To preserve any changes made to columns, filters, and columns for the next time you login, make sure to set a preset view. |
| Display orders and routes on the map. | Activate the |
.png)
View Order Details
Access order details:
- Click on an order on the map to see order status, time commitments, content information, and customer details.
- Navigate from the map or list to the order page to view full order details.
Take Action on Orders and Routes
You can use the different Planning and Dispatch views to identify orders that require attention, monitor route progress, and manage by exception.
 Action Buttons
Assign or Reassign Driver(s) or Vehicle(s)
Step 1: Select Assign or, if only one order is selected, you can also select
If you choose only one order, you can also select the order's link in the Assigned To column.
Step 2: Choose an available driver or vehicle.
Step 3: Select Create Optimized Route to create a new optimized route belonging to that resource, or New Route.
Step 4: If it is a new route, select a Route Identifier, and the scheduled start and end time.
Step 5: Finalize the route by selecting Create.
Optimize New Routes
Step 1: Select one or more orders at a time from the list or map, and select Optimize from the action bar.
Step 2: Confirm timing, or choose a new time frame for delivery.
Step 3: Confirm the selected resources, or adjust the selection with the resources you wish to assign to those orders. For example, if you would like all the orders to be optimized for a particular driver, unselect all resources except that driver.
Step 4: Select Optimize.
Designate Planned Routes
Select one or more orders at a time from the list or map, and select Mark Planned.
A ![]() 'P' icon will appear next to that route.
'P' icon will appear next to that route.
Review and Adjust Routes
Evaluate the quality of the routes you create by checking their KPIs and efficiency. Move orders around between routes to improve efficiency.
Select routes and unassigned orders in Planning, and then choose Adjust Route to see the selected routes on the Route Planner timeline.
Then you can make adjustments based on how they will impact your KPIs. Learn more.
Add Last Minute Orders to Routes
Easily add unassigned orders to existing routes. For example, add last-minute orders received only after the next day's routes were planned.
Step 1: Choose a date and teams in Order Manager.
Step 2: View route density on the timeline and activate the![]() eye icon to select which routes and unassigned orders to display on the map.
eye icon to select which routes and unassigned orders to display on the map.
Step 3: Multi-select (Command or Ctrl +Click) any unassigned orders you want to add to a single existing route.
Step 4: Select the route from the list to which you want to add the unassigned orders.
Step 5: Select Add to Routes from the action bar.
Bringg then plans the new orders within the existing routes according to the commitments to customers, and sequences them accordingly.
Send Planned Routes to Dispatch
Select one or more orders at a time from the list or map, and select Move to Dispatch.
Send Dispatched Orders Back to Planning
Select one or more orders at a time from the list or map, and select Move to Planning.
Monitor Route Progress
Check the status of routes in real time to supervise deliveries while en route, as well as prevent and resolve delivery issues. Learn more.
Step 1: Open the Route Monitor.
Step 2: Select the team(s) and date of the routes you want to view.
Step 3: View orders for each route on the list, timeline, and map. For example, easily see if a route is running very late, and call customers to reschedule their delivery.
| To... | Do this... |
|---|---|
| Pick and choose which routes to display on the map. | Use the |
| View the status and location of each order on the route. | Use the color-coded indicators to understand each order's status.
.png) |
| Check the route's utilized capacity to see if it can handle additional orders, or its fulfillment status at a glance. | Use the Max Weight column and Fulfillment status bar in the list view. Hover over a row to see more details. 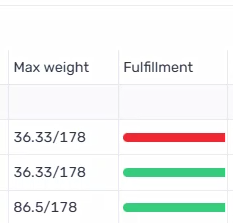 |