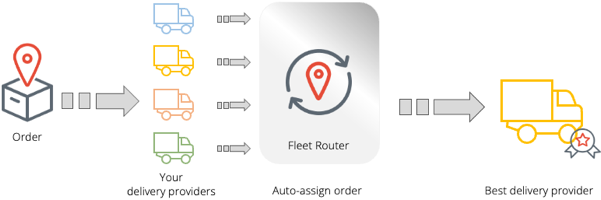
Set up Bringg's carrier selector to automatically assign the best carrier for each order, in line with your business priorities and delivery strategy.
Using the carrier selector saves dispatchers valuable time and guarantees the best service for you and your consumers when working with multiple carriers.
For each order, Bringg checks the ETA or delivery price offered by each carrier, which can vary by the delivery distance, dimensions of the goods, or additional services included in the order. Bringg then automatically offers the order to each carrier, starting with the cheapest or fastest, until one accepts the order. Alternately, Bringg can offer order assignments to carriers according to a predefined sequence.
For example, always offer orders first to your preferred local carrier, but if they are not available, offer the order to one of two other carriers, whichever can deliver the order fastest.
You can add your Own Fleet to the Delivery Hub features, to utilize a hybrid delivery network. Learn more.
 Use the carrier selector to automatically choose the best carrier to fulfill each order
Before You Begin
- Confirm you have a Bringg user of type Admin.
- Find and connect to carriers for each of your locations and fulfillment offerings, using the Delivery Provider Catalog. Learn more.
- Confirm that for each order, the carrier provides either their ETA, if you want to assign to the fastest carrier, or their estimated delivery price, to assign to the cheapest carrier. If a carrier does not provide their estimated delivery price, you can calculate it using rate cards.
- Contact your Bringg customer service representative to activate the carrier selector.
- (Recommended) Enter your delivery terms to qualify carriers for each delivery according to delivery area, or the goods and services included in the order. Learn more.
- (Recommended) Configure rate cards to calculate the exact delivery costs of an order according to your contract with each carrier. Learn more.
Procedure
Step 1: To access the carrier selector, select > Delivery Hub > Carrier Selector from your navigation bar.
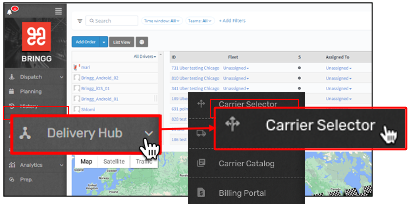 Navigate to the carrier selector
Step 2: Create a new rule for assigning orders to carriers by selecting Create.
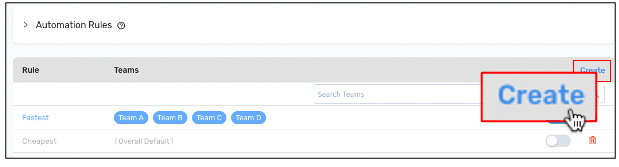 Create a new assignment rule
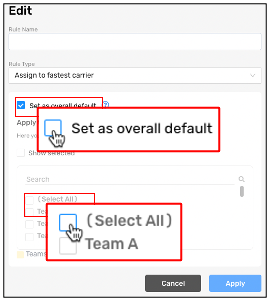
Step 3: To assign orders to the cheapest or fastest carrier, select the relevant Rule Type.
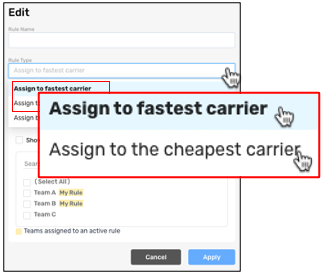 Assign order to carriers according to their response time or delivery cost
To... | Do this... |
|---|---|
Assign orders to the carrier with the lowest delivery cost. | Select Assign to lowest price fleet. Bringg retrieves the delivery cost for each order from the carrier using carrier quotes or from the carrier's rate card. The cost may vary by the goods or services included in the order, the distance to the destination, or the availability of carrier drivers. |
Assign orders to the carrier that can reach the customer fastest. | Select Assign to fastest fleet. Bringg requests an ETA for each order from the carrier using carrier quotes. ETA's depend on where the drivers are currently located, whether they are fulfilling previous orders and the type of vehicle they are using. Tip Currently, you can only compare delivery speed between different carriers, not including your Own Fleet. |
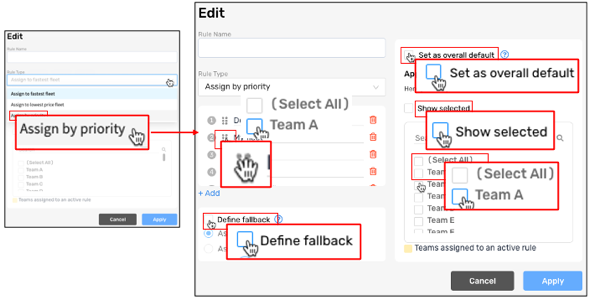
Step 4: To assign the carriers according to a preset sequence, select Assign by priority under Rule Type.
Bringg attempts to assign the order to the first carrier in the sequence, then the second, and so on.
For example, you may want to try to assign all orders to a local carrier first and then spillover to a national brand when they are not available.
 Assign orders to carriers according to a preset sequence
To... | Do this... |
|---|---|
Change the sequence of carriers. | Select the grip dots |
Add a carrier to the sequence. | Select +Add to include another carrier. If the carrier does not appear in the sequence, confirm the connection to them is active. Learn more. |
Remove a carrier from consideration. For example, if a carrier only delivers express orders and remove them for a rule that applies to standard orders. | Select the trash icon |
Select a fallback rule in case none of the carriers in the sequence can accept the order. | Select Define fallback and the fallback rule. For example, you may mainly work with three large carriers that provide discounts above certain order volumes. However, during peak hours you send spillover to two crowdsourced providers. Add the carriers to a preset sequence and then select a fallback rule to assign spillover either to the cheapest or fastest crowdsourced provider. |
 and drag the carrier to a different position in the sequence.
If a carrier cancels a delivery after accepting an order and before their driver picks up goods or Bringg can not find a driver from your fleet, the carrier selector assigns the order to the next carrier, according to the rule you have set up.
Step 5: Apply the rule to all or certain teams.
For example, several teams in an area may work with the same three carriers and the same rule, while a different team works with a completely different set of carriers and a different rule.
 Define the scope of the rule
To... | Do this... |
|---|---|
Apply a rule to all teams. | Select Set as overall default. |
Search for a team. | Enter the team name in the search bar. |
Apply a rule to specific teams. | Select the relevant teams from the list. Tip If your list of teams is long, select Show selected to view only the teams previously selected.S |
Step 6: Select Apply to save a rule.
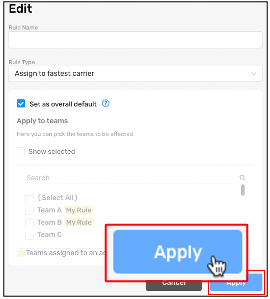 Save a new rule
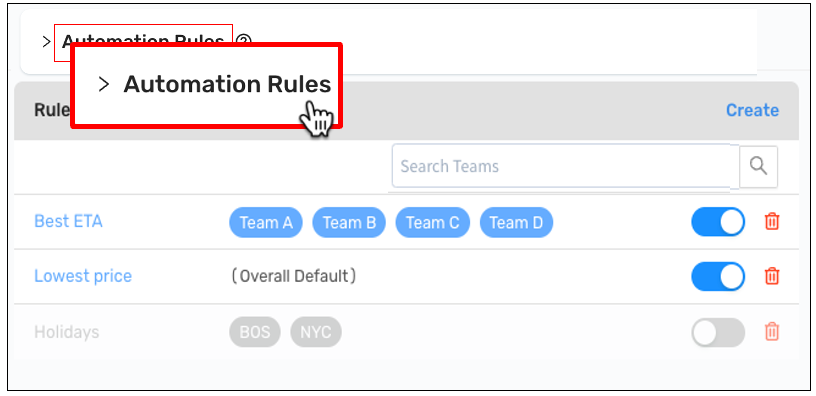
Step 7: To activate a rule, activate the toggle.
The carrier selector begins assigning orders to carriers as soon as the rule is active.
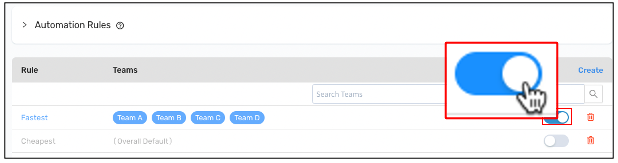 Activate a rule
Step 8: To temporarily pause a rule, deactivate the toggle.
For example, during the holiday season, you may work with two additional carriers and prioritize fast delivery over low delivery costs. You can pause your typical rules and activate a temporary holiday rule instead.
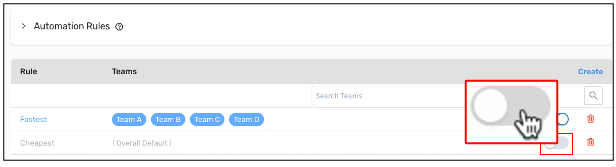 Pause a rule
 Step 9: To delete a rule, select the trash icon .
.
Step 10: Add advanced logic to your order flows with automations.
Consider whether these automations can advance your fulfillment goals:
To... | Do This... |
|---|---|
Unassign an order from one carrier, after they accepted the delivery request, and reassign it to a different one. For example, if the first carrier can not find a driver in time. | Build an automation that reads 30 minutes after fleet accepted order, and only if assigned a driver is no, then assign to next fleet by selecting:
|
Ensure a carrierdriver is assigned in time to deliver the order. For example, if the first carrier could not find a driver after 30 minutes, allow the second carrier 20 minutes to find one, and 10 minutes for the 3rd carrier. | Create a second automation to unassign an order from one carrier and reassign it to another as detailed in this article, then make the following changes:
Repeat as needed. 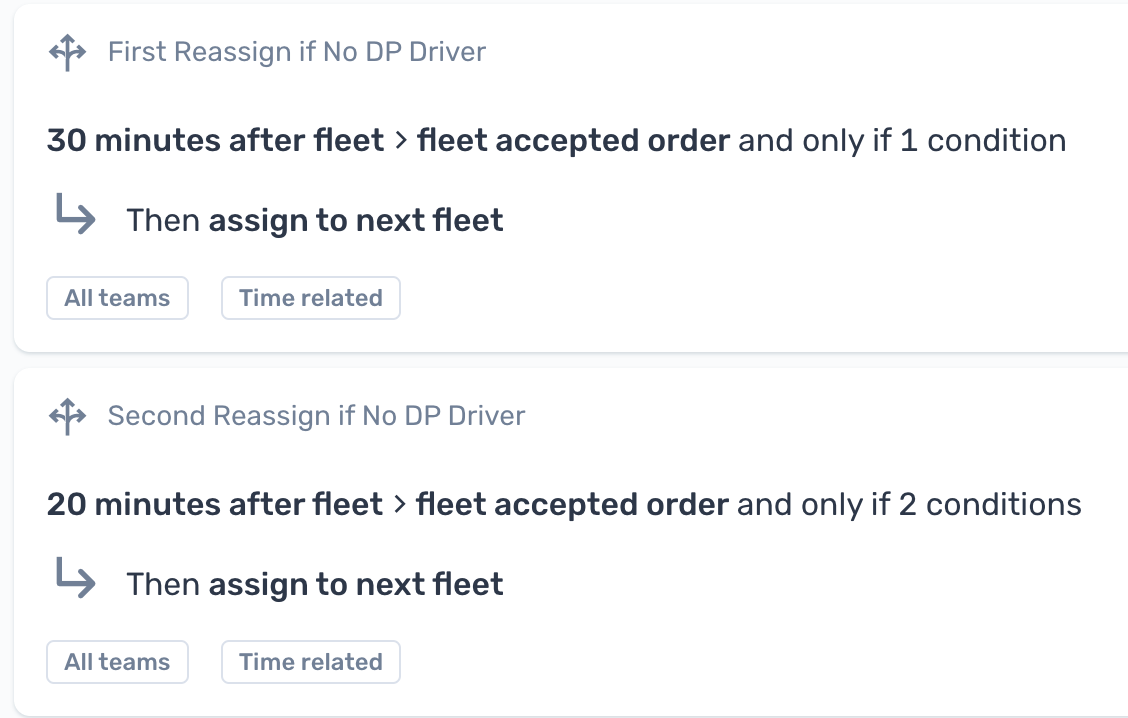 Ensure a carrier assigns a driver in time to deliver the order Ensure a carrier assigns a driver in time to deliver the order
|
 View advanced logic applied to the feature